Showing posts with label How to. Show all posts

Friday, 25 March 2016

How to remove icons from Top-Taskbar on Gnome


You are using the Gnome-Classic interface - either you are using this by choice, or you are using the fallback  mode which occurs if your graphics card & driver doesnt the 3D Acceleration required for the full Gnome-Shell GUI.
To add and remove application launchers in the gnome-panel you need to:

Press Win+Alt and right-click the top menu bar - N.B. Win is the Windows Symbol key
If you are not using Compiz then you need to :
Press Alt and right-click the top menu bar

Much more information is described in the linked Q&A and other links in that answer.

How to Change Microsoft Office 2010 License Key

You go to activate Microsoft Office 2010 and you receive a message stating, “Your copy of Microsoft Office Professional Plus 2010 cannot be activated because the specified Product Key has already been activated the maximum number of times permitted for your software license as specified in the Microsoft Software License Terms.”


The solution is to change the product key to another product key. I will show you three different methods of changing the License Key
Method 1
Open “regedit”

Navigate the registry to: HKEY_LOCAL_MACHINE\SOFTWARE\Microsoft\Office\14.0\Registration\ and delete the whole “Registration” key located under the “14.0″ key
Right click “Registration”
Select “Delete”

Press “Yes”


Close Regedit, Restart an Office 2010 application. You should be prompted to reenter your License Key

Method 2
Open to Microsoft Word
Press “File”
Press “Help”
Select “Change Product Key” (this option was not here on my installation, I used Method 1)


Method 3
Click on Start Menu > Control Panel > Programs and Features (or Add/Remove Programs, depending on your operating system).
Click on your product, e.g. Microsoft Office Professional Plus 2010
Click “Change” on the top menu.


Select the option to “Enter a Product Key.”
Press “Continue”


Changing your Product Key
Once you complete one of the Methods listed above you should be able to change your Product Key
Enter the appropriate product key from the top of this page and click “Continue.”


Accept the agreement
Press “Continue”

Configuration will occur

Press “Close”

Select “I want to activate the software over the Internet (recommended)”
Press “Next”

Your product should activate successfully
Press “Close”


How do You Install XvidCap on uBuntu 12.04 Distro

Xvidcap is a small tool to capture things going on on an X-Windows display to either individual frames or an MPEG video. This software is not present in the Ubuntu 12.04 repository by default. You can get a copy of the distributed binary in the form of a .deb package at the following link.
https://launchpad.net/ubuntu/precise/amd64/xvidcap/

Once you download this package, go ahead and install the package with the following command. The amd64 package given as example is for 64 bit machine.
$ sudo dpkg -i xvidcap_1.1.7-0.2ubuntu12_amd64
In case if the above command fails giving out errors, please note that Xvidcap depends on libavdevice-extra-53 package. So go ahead and install this package first with the following command.


$ sudo  apt-get install libavdevice-extra-53
By default, the Ubuntu 12.04 comes with libavcodec53 package. This conflicts with the  libavdevice-extra-53. In such a case, feel free to go ahead and replace the libavcodec53 package with libavdevice-extra-53. This satisfies the dependency requirement for Xvidcap.

Once done with setting dependencies, you can then install the Xvidcap package.

Solve VMWare Workstation 9 Error on Linux Kernel 3.8.0-26

I have VMware Workstations 9 installed on my uBuntu 13 machine and today without any apparent reason it stop working throwing me the following error, every time I've tried to boot up any VM machine.


To solver the problem .. here is what I have done ... created bash script to handle problems with VMware Player on 13.04 ...


  • #!/bin/bash
  • if [[ $UID != 0 ]]then
  •     echo "Please run this script with sudo:"
  •     echo "sudo $0 $*"
  •     exit 1
  • fi
  • sudo ln -s /usr/src/linux-headers-$(uname -r)/include/generated/uapi/linux/version.h/usr/src/linux-headers-$(uname -r)/include/linux/version.h
  • cd /usr/lib/vmware/modules/source
  • sudo tar -xf vmci.tar
  • cd vmci-only
  • sudo sed '127s/.*/   .remove = vmci_remove_device,/' driver.c > driver.c.tmp
  • mv driver.c.tmp driver.c
  • sudo sed '1753s/.*/static int/' driver.c > driver.c.tmp
  • mv driver.c.tmp driver.c
  • sudo sed '1981s/.*/static void/' driver.c > driver.c.tmp
  • mv driver.c.tmp driver.c
  • cd ..
  • sudo tar -cf vmci.tar vmci-only/
  • sudo rm vmci-only/ -Rf
  • sudo vmware-modconfig --console --install-all
  • sudo rm /usr/src
  • Before write the script I've open the terminal and type " #sudo kate " then when kate opened I entered the script and saved on " /usr/src/open-vm-tools-xxxx.xx.xx" (replace the x with year month and day) and save it. Then closeKate

    The Open terminal again and do the following;


    after you should have VMware workstation running...


    This is another posting showing "BD Tech Buzz" for everyday computer usages... For a general public

    How To Hide Local Disk Drive Using CMD Diskpart

    As Every computer user have some personal or private data which they want to hide or protect from others. If  you want to Store Less amount data which you can easily  Store in Folder. 
    But If You want Hide large account of data or want to hide full drive from others. Then follow these steps carefully

    Steps To Hide Your Local Drive

    •  Go To Start >> Then Run >> Then Type Diskpart
    • New black Window will appear and then type list volume press enter
    • Now your all drive will appear, now if you want to hide Drive D
    • Then Type select volume X  and press enter.  (Replace x with volume no)
    • Then Type remove letter D and press enter again.
    • Now Go to your my computer then you will find that your D drive is hidden.

    Steps To Get Back Your Hidden Drive

    • Go To Start >> Then Run >> Then Type Diskpart
    • Then Type list volume press enter
    • Now your all drive will appear, now if you want to unhidden Drive D
    • Then Type select volume X and press enter. (Replace x with volume no)
    • Then Type assign letter D and press enter again.
    • Now Go to your my computer then you will find that your D drive is unhidden.
    Then your Hidden drive will start appearing. Lets take one look on all steps in this figure
    Note:- Volume No of each drive is according to its drive letter. Never use the same values as mention in the post. Volume no is just before the drive letter.
    If  there any Problem or trouble with this tricks then leave your comment.

    How to Disable/Remove Blue Seen Tricks In WhatsApp - 2016

    WhatsApp is the world’s most popular messenger or cross platform messaging app for mobile phones which is used to send free SMS, Photos, Audios and Videos through internet. It is the highly downloadable app on mobile phones as compare to other apps.  As we all know through the last 2 years WhatsApp becomes the most famous messaging app for Android or other smartphones and also acquired by the giant social networking site Facebook. But if you have not Android or any smartphone then don’t worry you can also Download WhatsApp on your PC or Laptop. Every time the developers add new features and update new versions. So recently WhatsApp developers add new feature called “Check Mark” or“Read Receipt” which will appear when you send every message to your recipient. Below is the function of “read receipt ” feature.

    Make Money From Your Website/Blog

    How To Disable Blue Ticks from WhatsApp

    If you are really not satisfied with this feature then don’t worry you can remove or disable this “Blue Ticks” or check marks. To remove this feature people not able to know that you read their message or not. May be some people know how to disable o remove these blue tick but those who don’t know don’t worry just follow below given steps to remove “read receipt”.
    WhatsApp New SEEN Update: Read Receipt/ Blue Ticks Function
    whatsapp blue seen tick

    Step 1:- Download Latest version of  WhatsApp. Mobile user can also download from Google Play Store
    Download From Google Play Store

    Download WhatsApp

    Step2:- After Downloading new version >> Click on your WhatsApp account settings.
    Step3:- Settings>> Then click on Account>> Privacy.

    Step 4:- Scroll down and you will find “Read Receipt” feature option. It will show you Tick on it Simply just Uncheck the tick option.

    Another Method


    Step 1:- Download WhatsApp+ (Plus) from Gogle Play Store.
     
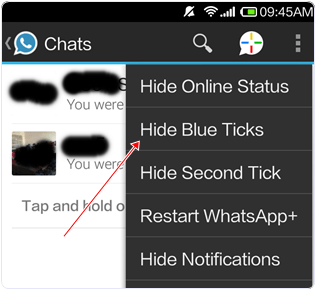
    Step 2:- After Installing WhatsApp Plus go to your WhatsApp menu and and click on Hide blue Ticks.  
    remove/disable blue ticks in whatsapp
    Note:- Those person who already have new version of WhatsApp they can simply follow the above steps and remove read receipt but those person who have not find Read Receipt option in privacy setting firstly download latest version of WhatsApp then follow the above steps.

    I hope you will remove read receipt feature with the help of above steps, but if you can find any problem regarding these steps then feel free to ask.

    How To Transfer Data From Android To PC/Laptop Using WIFI

    Many times we need to transfer data from our phone to PC/Laptop or vice verse because of to save our personal photos, audios, videos and other files in PC/Laptop or mobile phone. In every day we often connect our phone to computer with the help of USB. But you cannot carry or have USB all the time with you but any situation or time when you have to need to transfers data from computer/laptop to your phone  or vice verse in college or any other place then it becomes difficult for it. But don’t worry there is always a solution of every problem so that for this problem a Software Data Cable app is designed for android users to transfers the data from mobile phone to computer or computer to mobile phone without any use of data cable. This app is free of cost and you can download it from Google play store. With the help of this app it becomes easy, fast and secure way to to transfers data.  This app can Connect and share everything among phones, Pad, Google TV, Cloud storage, Xbox, PC, Mac, Laptop etc. So here is a simple steps to download and transfers data from android phone to PC/Laptop or vice verse without using data cable.


    Best AdNetwork You Must Try


    Steps To Transfers Data From Android Phone To PC


    #1. First of all you have to an same WiFi network connection on computer or your android phone.
    #2. Then simply Download the Software Data Cable app from Google Play Store.
    Download Software Data Cable App
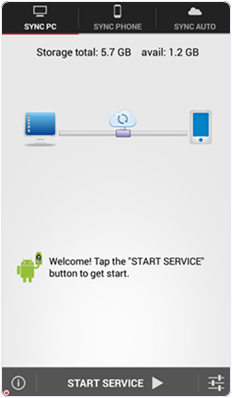
    download-Pepsi-Skate-3D-sync-data
    #3. Install the app in your android phone and click on start service.
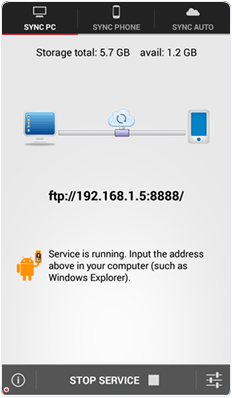
    download-Pepsi-Skate-3D-ip-address
    #4. Then it will show you ftp://192.168.1.5:8888 address, simply copy the address or fill into your computer address bar and click OK. It will show you storage folder where your all files stored now  you can transfers the data from your android phone to computer or vice verse.
    ip-address-in-my-computer
    I hope you like this method and find easy to use. In case you have any question please leave your comments below.

    How To Make Whatsapp Service Free For Lifetime – 2016

    Whatsapp is a most popular and widely used Messenger app on smartphones. Whatsapp is highly downloadable mobile application. Every internet user prefer to use messenger apps like whatsapp instead of doing sms. Their number of best messenger apps for android device. But from all them whatsapp become most popular platform. Even we can download whatsapp on PC.  But widely whatsapp is used for texting on mobile. We can easily share files on whatsapp and do texting and calling for with our contacts. But to do chat our contacts must have whatsapp also. Whatsapp messenger is products of Facebook. But the most common issues which are now in trend for whatsapp is, it yearly subscription. We all knowwhatsapp service for lifetime is not available. Whatsapp provide 1 year subscription which we have to extent buy paying $1 for each year as service charge.
    Earn Money Use This


    How To Make Whatsapp Service Free For Lifetime

    Important Update:-  Recently Whatsapp Announced that their are make whatsapp service free for lifetime for all users and also it will stay ad free messenger. So now you don’t need to follow any particular task. If you want to confirm your whatsapp service is free for lifetime or not then you can check at payment info options.
    If you are currently using whatsapp on your device then your free service time period should be going on. As You can check your current subscription time period as following.
    • Open Your whatsapp account then go to settings tab >> Then Account tab >> Payment info.
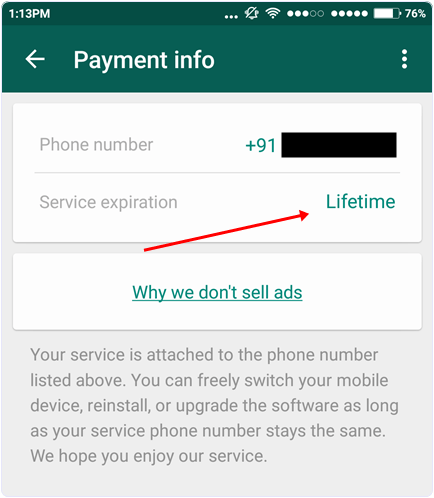
    • Now Check out your current service expiration time period. If your is any specific date that means it not lifetime. If they shown lifetime then you don’t need worry about anything. As you can see below whatsapp lifetime service screenshot of my account.
    • If whatsapp subscription is not currently lifetime then don’t worry. You just need to do these follow small tricky methods.
    • First of all you need to understand how whatsapp service time period works.
    • Whatsapp service assign mobile number based subscription. That means if 1 mobile number is considered as 1 account. But subscription time period depends on Mobile IMEI number or in other words device to device.
    • Now to make your whatsapp service free for particular mobile number. You need to arrange fresh device where whatsapp is never installed. Like you can use your parents, relatives etc who don’t use internet or don’t have any interest in whatsapp.  Simply ask them to give you device for 5-10 min.
    • Then you need to uninstall whatsapp account using that particular mobile XXXXXwhatsapp number which you make free for lifetime.
    • After uninstalling from previous device. Download whatsapp fresh device which you borrow. Then to activate subscription use your current XXXXX mobile number which you want to make lifetime.
    • After verifying mobile number then again check your current service time period in payment info. Then 1 year of service time period hopefully should be increased.
    • If it not works then try on other devices. Follow this process on 3,4 devices then your whatsapp time period will automatically turns into lifetime period.
    • Note:- Specially on MI devices changes to make whatsapp lifetime service subscription is more that any other like Samsung or iPhone.
      PS:- I know $0.99 is little bit amount and everyone can easily afford. So if your are not interested to do. Then its our own business. Our purpose is to help those who can afford, who are facing problem while paying online. Or young guys whose don’t able to use and many more reasons.
      I feel that this method to make whatsapp lifetime service for free which be helpful for you. I hope it works fine because i have tested this method manually to make whatsapp free for lifetime. But some how if its not working then i recommend you to pay services charges to support developers. But if you don’t able to pay then take help from someone who know more about using internet than you to pay for you.
      If you like this method then don’t forget share it with your friends.
    Check whatsapp service lifetime period
    Back to Top