Showing posts with label Tips and Tricks. Show all posts

Friday, 25 March 2016

Solve VMWare Workstation 9 Error on Linux Kernel 3.8.0-26

I have VMware Workstations 9 installed on my uBuntu 13 machine and today without any apparent reason it stop working throwing me the following error, every time I've tried to boot up any VM machine.


To solver the problem .. here is what I have done ... created bash script to handle problems with VMware Player on 13.04 ...


  • #!/bin/bash
  • if [[ $UID != 0 ]]then
  •     echo "Please run this script with sudo:"
  •     echo "sudo $0 $*"
  •     exit 1
  • fi
  • sudo ln -s /usr/src/linux-headers-$(uname -r)/include/generated/uapi/linux/version.h/usr/src/linux-headers-$(uname -r)/include/linux/version.h
  • cd /usr/lib/vmware/modules/source
  • sudo tar -xf vmci.tar
  • cd vmci-only
  • sudo sed '127s/.*/   .remove = vmci_remove_device,/' driver.c > driver.c.tmp
  • mv driver.c.tmp driver.c
  • sudo sed '1753s/.*/static int/' driver.c > driver.c.tmp
  • mv driver.c.tmp driver.c
  • sudo sed '1981s/.*/static void/' driver.c > driver.c.tmp
  • mv driver.c.tmp driver.c
  • cd ..
  • sudo tar -cf vmci.tar vmci-only/
  • sudo rm vmci-only/ -Rf
  • sudo vmware-modconfig --console --install-all
  • sudo rm /usr/src
  • Before write the script I've open the terminal and type " #sudo kate " then when kate opened I entered the script and saved on " /usr/src/open-vm-tools-xxxx.xx.xx" (replace the x with year month and day) and save it. Then closeKate

    The Open terminal again and do the following;


    after you should have VMware workstation running...


    This is another posting showing "BD Tech Buzz" for everyday computer usages... For a general public

    How To Hide Local Disk Drive Using CMD Diskpart

    As Every computer user have some personal or private data which they want to hide or protect from others. If  you want to Store Less amount data which you can easily  Store in Folder. 
    But If You want Hide large account of data or want to hide full drive from others. Then follow these steps carefully

    Steps To Hide Your Local Drive

    •  Go To Start >> Then Run >> Then Type Diskpart
    • New black Window will appear and then type list volume press enter
    • Now your all drive will appear, now if you want to hide Drive D
    • Then Type select volume X  and press enter.  (Replace x with volume no)
    • Then Type remove letter D and press enter again.
    • Now Go to your my computer then you will find that your D drive is hidden.

    Steps To Get Back Your Hidden Drive

    • Go To Start >> Then Run >> Then Type Diskpart
    • Then Type list volume press enter
    • Now your all drive will appear, now if you want to unhidden Drive D
    • Then Type select volume X and press enter. (Replace x with volume no)
    • Then Type assign letter D and press enter again.
    • Now Go to your my computer then you will find that your D drive is unhidden.
    Then your Hidden drive will start appearing. Lets take one look on all steps in this figure
    Note:- Volume No of each drive is according to its drive letter. Never use the same values as mention in the post. Volume no is just before the drive letter.
    If  there any Problem or trouble with this tricks then leave your comment.

    How to Disable/Remove Blue Seen Tricks In WhatsApp - 2016

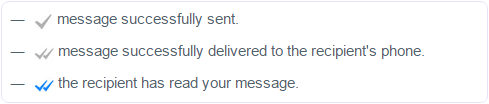
    WhatsApp is the world’s most popular messenger or cross platform messaging app for mobile phones which is used to send free SMS, Photos, Audios and Videos through internet. It is the highly downloadable app on mobile phones as compare to other apps.  As we all know through the last 2 years WhatsApp becomes the most famous messaging app for Android or other smartphones and also acquired by the giant social networking site Facebook. But if you have not Android or any smartphone then don’t worry you can also Download WhatsApp on your PC or Laptop. Every time the developers add new features and update new versions. So recently WhatsApp developers add new feature called “Check Mark” or“Read Receipt” which will appear when you send every message to your recipient. Below is the function of “read receipt ” feature.

    Make Money From Your Website/Blog

    How To Disable Blue Ticks from WhatsApp

    If you are really not satisfied with this feature then don’t worry you can remove or disable this “Blue Ticks” or check marks. To remove this feature people not able to know that you read their message or not. May be some people know how to disable o remove these blue tick but those who don’t know don’t worry just follow below given steps to remove “read receipt”.
    WhatsApp New SEEN Update: Read Receipt/ Blue Ticks Function
    whatsapp blue seen tick

    Step 1:- Download Latest version of  WhatsApp. Mobile user can also download from Google Play Store
    Download From Google Play Store

    Download WhatsApp

    Step2:- After Downloading new version >> Click on your WhatsApp account settings.
    Step3:- Settings>> Then click on Account>> Privacy.

    Step 4:- Scroll down and you will find “Read Receipt” feature option. It will show you Tick on it Simply just Uncheck the tick option.

    Another Method


    Step 1:- Download WhatsApp+ (Plus) from Gogle Play Store.
     
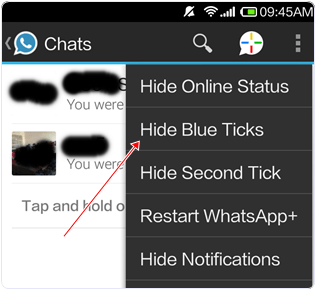
    Step 2:- After Installing WhatsApp Plus go to your WhatsApp menu and and click on Hide blue Ticks.  
    remove/disable blue ticks in whatsapp
    Note:- Those person who already have new version of WhatsApp they can simply follow the above steps and remove read receipt but those person who have not find Read Receipt option in privacy setting firstly download latest version of WhatsApp then follow the above steps.

    I hope you will remove read receipt feature with the help of above steps, but if you can find any problem regarding these steps then feel free to ask.

    How To Change Username Of Facebook Pages Twice

    To setup a short URL address directly to your Facebook Page you need to choose a Username. Facebook has setup a short limit of minimum for claiming username. At present you need 25 fans to your Facebook page to choose your own choice username. Once you pick a username, the link to your page will appear like this:
    www.Facebook.com/username where username will be your brand name or any other Like this is my Fans Page AllTechBuzzBD
    But once you claim username then its not possible to change username again because of Facebook limits. So it becomes huge problem for those who choose wrong or misspell username and they were not able to change.

    Get Best Earn from your Website/Blog

    But now In the month of June 2012 Facebook Introduce New feature in pages that you can now claim a Facebook username twice. This means that if you are not happy with your current page username then you can change it again.
    If you want to change your username 2nd time then  follow simple steps
    Open your Facebook page >> Then Go to Update Information tab >> In third row you will see username where your old username is display >> under the username link their is option of change username address >> After clicking on change request choose your new username >> Then select your new username.

    facebook username

    How To Unlock Pattern Lock On Android Phone (3 Ways)

    It is a very easy and simple  method to secure our personal mobile phone data with pattern lock. We have to just draw a pattern and that’s it and you don’t have to bother put numbers or characters for password because we can easily forget numbers and characters as compare to pattern lock. It is a very rare case but you may forget your pattern lock. As usual we use gmail account in play store it become easy to reset but if you don’t have an email address to reset it. So don’t worry, those who forgot or might be forget their android pattern lock can easily unlock pattern lock without losing their personal data. Here we found some methods through which you can unlock pattern lock any of your android smartphone. We are going to explain different methods to unlock android smartphone pattern lock without losing data. So choose which you find out easy to do.
    Best Adnetwork- Best Earn

    Method 1st:- Unlock Pattern Lock On Android Without Losing Data

    • Download Aroma File Manager.
    • A memory card for android device.
    • You android device either locked by pattern lock or password lock.
    Step 1. After download Aroma File Manager place it in your memory card (SD card). Insert the memory card into your locked android device.
    Step 2. Open Stock Recovery Mode with reboot your android device and pressing Power Key and Volume up key simultaneously. Different phones may be have different methods to open stock recovery mode so if you face any problem Google it.
    Step 3. After entering into recovery mode use Volume+ and Volume- buttons to scroll up and down. For select use middle button.
    Step 4. From there click on “Install Zip from SD Card” and give path to install“Aroma File Manager” from SD card.
    Step 5. After installing, it will open in recovery mode.
    Step 6. From the Aroma File Manager navigate to settings >> go to bottom and click on “Automount all devices on start” and then exit.
    Step 7. Repeat Step 4 & 5 again.
    Step 8. After this you will get “Aroma File Manager” opened again.
    Step 9. Now navigate to Data Folder >> System Folder  and find >>“gesture.key” or “password.key” for pattern lock or password lock respectively.
    Step 10. Delete that any one file and then exit aroma file manager and reboot your android device. After rebooting you will notice that password or pattern lock not removed. But don’t worry draw any pattern and you will open your android device but remember or note that pattern.

    Method 2nd:- Unlock Android Pattern Lock

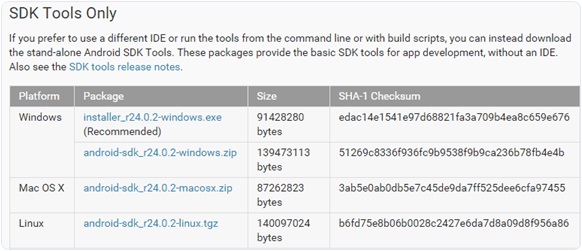
    1. First Requirement is Download Android SDK and here I will show you How To download and install Android SDK Tools.
    Android-sdk-tools-interface
    • Download and install Android SDK Tools for run ADB commands. Now select platform according to you download and install it.
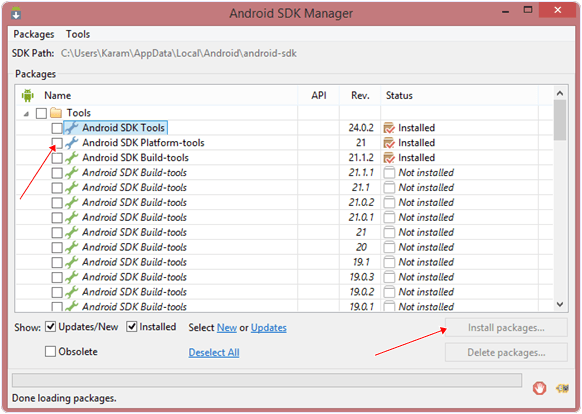
    • After installing open it, unchecked the other packages and check Android SDK Platform-tools and then click on install packages according to the image given below.
    Android-sdk-tools-manager
    2. So the other requirement is USB Debugging should be enable before your android device locked.
    3. The process will not be helpful if you doesn’t have specific and compatible drivers for your phone. So you should be very careful While installing your device compatible drivers.

    Steps To Unlock Android Pattern Lock

    Step 1. Connect your locked android phone with PC/Laptop via USB.
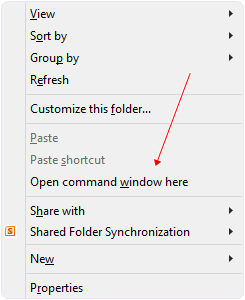
    Step 2. Open folder where you installed Android SDK Tools Users >> App Data >> Local >> Android >> Android-SDK >> Platform-Tools and then click on blank space hold shift and click right mouse button and select “open command window here”.
    open-command-window-setting
    Step 3. It will open you command window now you have to put some commands in the command window:-
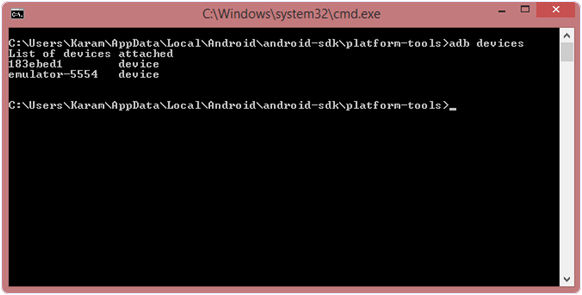
    For check your device is connected or not put command:-

    ADB DEVICES 
     Android-sdk-cmd-settings-to-unlock-pattern
    Now put these commands:-

    ADB SHELLCD /DATA/DATA/COM.ANDROID.PROVIDERS.SETTINGS/DATABASESSQLITE3 SETTINGS.DBUPDATE SYSTEM SET VALUE=0 WHERE NAME=’LOCK_PATTERN_AUTOLOCK’;UPDATE SYSTEM SET VALUE=0 WHERE NAME=’LOCKSCREEN.LOCKEDOUTPERMANENTLY’;.QUIT
    If above commands not working put:-
    ADB SHELL RM /DATA/SYSTEM/GESTURE.KEY
    Step 4. Once you done you have to reboot your android device. Now its all done.
    After rebooting your device you will see the pattern lock disabled. So in this method USB Debugging should be enable before locked and it is must. But If it is not enable then you cannot proceed further steps.

    Method  3rd:- Unlock Pattern With Factory Settings (Data Will Lost)

    In the above methods we used PC/Laptop, we downloaded software and we put some commands. But if you haven’t PC/Laptop or your device was not enable USB Debugging then you can follow this method
    NOTE:- IN THIS METHOD YOUR ALL DATA WILL BE LOST. SO IF YOU DO NOT WANT TO LOSE YOUR DATA THEN DON’T  FOLLOW THIS METHOD.
    Step 1. First Switch off your Locked Android Device.
    Step 2. Now, boot your Android device into “Recovery Mode” using specific keys by holding power key and volume up key simultaneously.
    Step 3. After opening Recovery Mode
    • Select “Factory Data Reset” option and give “Yes“.
    • Select “Wipe Cache Partition” to wipe cache data.
    Step 4. After above steps Reboot your device.
    Step 5. All Done ! Now, your device will start from the scratch.
    I feel that you have learn something interesting facts about how to unlock pattern lock on android. But few may use this to hack but we can you this in a right way to open someone phone or even yours in trouble time. If you have any question leave your comments below.

    How To Recover Deleted Whatsapp Messages (Updated)

    Today here we discuss about recover deleted whatsapp messages. Whatsapp doesn’t use any online database for data storage. All the storage is done on user side in phone memory. But sometimes by mistake we delete our personal messages from our mobile phone chat by mistaken. We can’t recover deleted inbox messages. These kind of situation are really frustrating. But on the other hand if you using Whatsapp. You can easily recover deleted whatsapp messages. But officially their is not any particular fixed method to recover whatsapp deleted chat. But here we will discuss about the possible ways to recover deleted whatsapp messages. Which will make your whatsapp life more safer than ever.

    Make Money Online Easily


    How To Recover Deleted Whatsapp Messages Recently

    Now its simple to recover anything which is less than seven days old. You just have to uninstall whatsapp and re-install it. Because whatsapp automatically create backup file of whatsapp data everyday at 4 AM according to system time. This data backup file is stored on mobile SD card. So when you re-install whatsapp it will show Restore option. Simply click on it and all data which is less than seven days old will be restored.

    Recover Whatsapp Chat Older Than Seven Days

    If you want to restore chat which is older than seven days then follow below given methods. There are two methods through which you can recover deleted whatsapp messages which is older than seven days.

    Method 1st:- Manually Recover Whatsapp Deleted Chat

    • As we told above whatsapp create automatically backup file of your data and it stored in SD card.
    • The route of stored data is:- sdcard/Whatsapp/Databases. 
    • When you find Database you will see different files which looks like “msgstore-YYYY-MM-DD.db.crypt”. The YY-MM-DD is on which year, date and month the file is create.
    • So first you have to change the name of  “msgstore.db.crypt” file rename it or add some other word/character before the “msgstore” like “Old” or etc.
    • Now check out the other files which are saved on the different date. Select the file which is created before your deleted messages. And rename it “msgstore.db.crypt”
    • After rename the selected file uninstall your whatsapp and re-install it and selectRestore option. It will restore your all chat which were deleted after the date of selected file.

    Method 2nd:- Recover Whatsapp Messages Through Software.


    Note:- After connecting mobile phone with PC/Laptop via USB enable the USB Debugging option in the mobile phone. Simply Go Developer option >>> USB Debugging and enable it.
    Step 1:- First download Android Data Recovery Software. It will restore your all whatsapp data like messages, images, audio and videos.
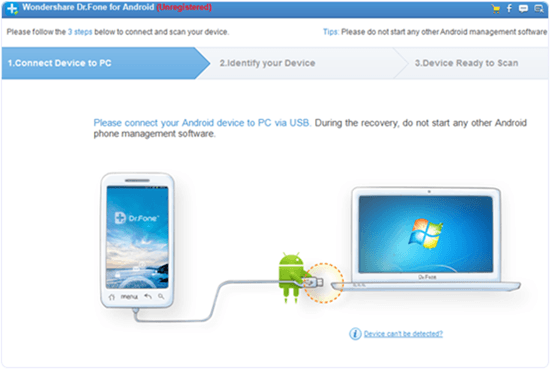
    Step 2:- After installing Android Data Recovery connect your mobile phone with PC/Laptop via USB.
    Recover whatsapp deleted messages with wondershare
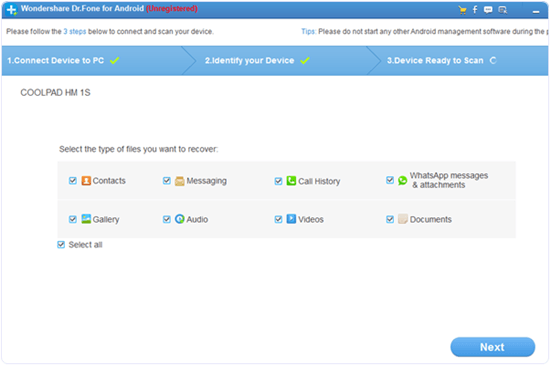
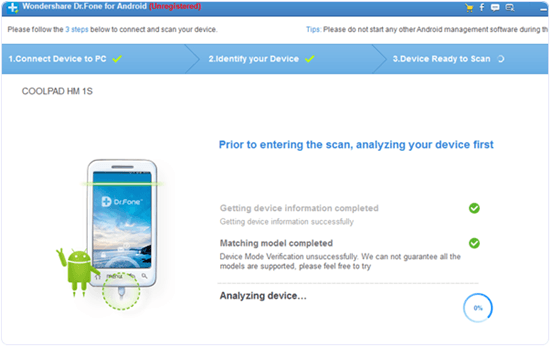
    Step 3:- It will automatically detect your device and start processing. After that click on Next and select option what you want to recover.
    Recover whatsapp deleted messages with wondershare options
    Step 4:- Now click Next.
    Recover whatsapp deleted messages with wondershare scanning

    Another Whatsapp Messages Recovery Online Tool

    There is also a online tool Recover Messages. With the help of this tool you can recover deleted whatsapp messages. This is a free online tool which can extract the contents of backup file. Simply connect your mobile with computer. Then go to recover messages site select the backup file from database which you want to restore like  “msgstore.db.crypt” and start process. It will restore your deleted whatsapp messages. You can only read

    Recover Deleted Images, Audio and Videos (From Chat)

    If you want to restore delete images, videos and audios from whatsapp chat. Then don’t worry because they are not permanently delete from whatsapp.
    • Go to File Manager On Mobile.
    • Click on Whatsapp folder >> Media.
    • Then you will see whatsapp images, audio and videos folder.
    • These are the folders where whatsapp images, audios and videos stored. You can also check this on your computer by connecting.

    These are few working method to recover deleted whatsapp messages online and offline both. If you have any best method to recover whatsapp messages let us know.


    How To Mention Tag All Friends In Facebook Comments At Once

    Facebook is most social media platform. We enjoy own spare time by using Facebook Where we share our ideas, views and other day to day moments. We share own photos, status, videos with our Facebook friends. We all have many friends on Facebook. Even we have join groups, events and likes pages. With the combination of all these things. We regularly get hundreds of updates in own news feed. In the same way our friends do. Facebook has complex algorithm which hide unseen post. Even hide post from friends who is not so frequent on Facebook. That the reason our Facebook don’t show interest in own posts. Just because our post was not able to reach them accurately.
    Make Money Online Easy way

    Note:- This Script Only Able to Mention friends into text status. It will not works on photo post.
    1. First of all you need to open your Facebook account. Then particular status where your want to mention or tag all friends in Facebook comments.
    2. Then open tag post into new tab or your browser so that only particular will visible.
    3. Open below given script and copy paste all the code.
    4. After copy all code, go back to tab where status is open.
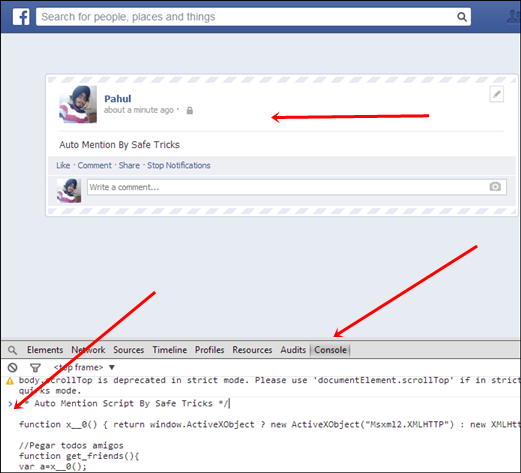
    5. Then Click F12 button and Inspect element box will be start appearing.
    Mention/Tag To All Friends In Facebook Comments script
    6. Switch to console tab and paste all the codes which we copy from above.
    7. After Pasting code into console press enter. Now wait for few sec your all friends get auto tag in Facebook comments.
    Note:- For Firefox users, Sometimes browser may blocks this script. In case if it doesn’t works then check protection place just before HTTPS. If it is show block message then allow it and again try whole process to tag all friends.
    I hope you enjoy this amazing tricks about how to tag all friends in Facebook comments at once. If the above code is not working please let us know in comments or if you have any best way to mention all friends. Then let us know we will appreciate it.

    How To Transfer Data/Connect Two Laptops Using WIFI

    As we can share data between two laptop devices with LAN cable easily. Sometimes we are not in the state to access LAN cable. In that situation we need to transfer large data. Then best possible solution is to connect two laptops using WiFi network. Even connecting device wirelessly is easy and we can move design where we feel comfortable. As we ready explained about transfer data from android to laptop using Wifi. In the same way we can also connect two laptops using WiFi easily. We just need to make a small adhoc network to share files with others. Laptops has wireless cards so with the helps of laptops we can create an adhoc network without any wireless WiFi router. Even we can use our mobile hotspot to create wireless network between laptops. If you do not know how to configure a wireless network then this post is really for you. Here we are going to discuss about how to connect two laptops using WiFi. Which is really and best way to create wireless network between two laptop.
    Make Money From Here


    How To Connect Two Laptops Using WiFi.

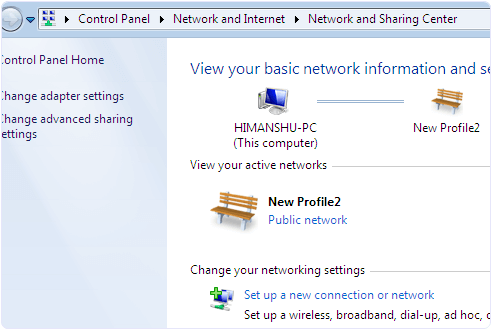
    Step 1. Open the control panel and then click on Network and internet option. Then you see the network and sharing option. Open it.
    Step 2. Now you see the Network and sharing Window with many options. You have to click on the setup a new connection.Windows network and sharing settings for wifi connection
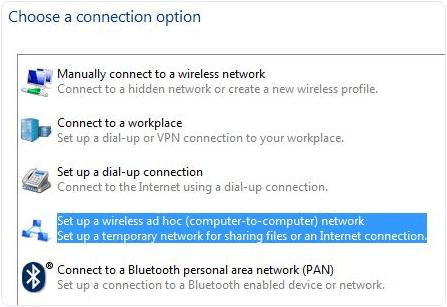
    Step 3. Now you see a choose connection option Dialog. In the dialog look for set up wireless and adhoc network.
    Set up wireless connection network windows
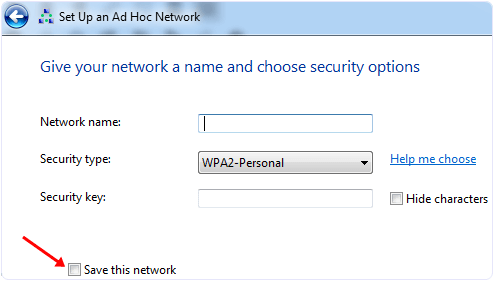
    Step 4. Now you can see the next window with Network name, security type and security key option.
    Step 5. Now you have to give a name to your network and choose a security option. The default security option is WPA2-Personal which is stronger.
    Set up adhoc network on windows
    Step 6. You can also leave the security option with no authentication and WEP.
    Step 7. Do not forget to tick the checkbox with save this network option. If you don’t tick the option then after disconnecting the network you have to configure the network again.
    Now your wireless network is ready and shown with other networks. Click on your network to connect. After connecting you will see a message at right hand side of network name waiting for users.
    Now you have to share data among Wireless Network.

    Workgroup Sharing Settings.

    If your Laptops have different OS then you have to use the Workgroup sharing option because, this option can share data among similar and different OS.
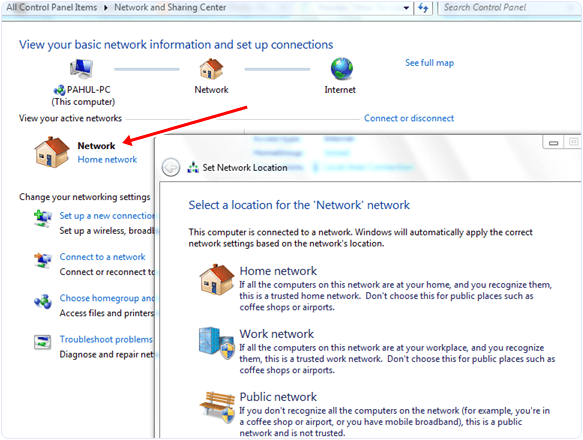
    Step 1. First you need to check adhoc network you created, its network type should be Home or work.
    Step 2. If not then open the network and sharing center then click on the name of network if it says home network then you do not need to change the network type otherwise you have to select home network.
    Windows workgroup network location settings
    Step 3. This setting allow you to share your data with other computers. Other thing you need to check is that all the computers are in the same workgroup.
    Step 4. In Windows XP you can change Workgroup setting by right clicking on My Computer and select properties. Look for system properties and click on the Computer Name tab to change the settings.
    Step 5. In Windows Vista and higher versions right click on computer and click on properties. You can change this settings in Computer name, Domain name and workgroup settings section.
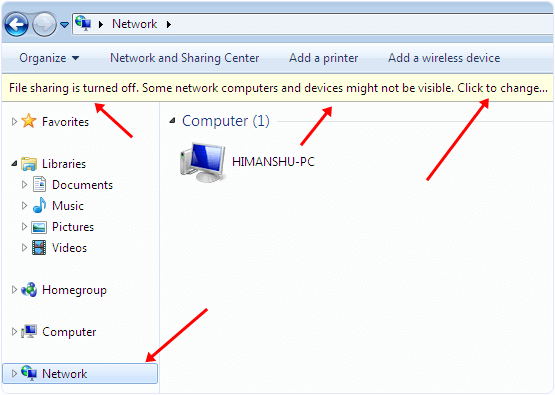
    Step 6. Last thing that we should apply to Windows 7 PC from which we want to access other computer is to open the Explorer and click on the Network option.
    Windows file sharing settings on network
    Step 7. After that you see a popup bar with Network discovery and file sharing are turn off. Network computers and devices are not visible. Turn on this settings to allow sharing of resources.
    Follow the above steps to all the network computers to allow sharing with them.
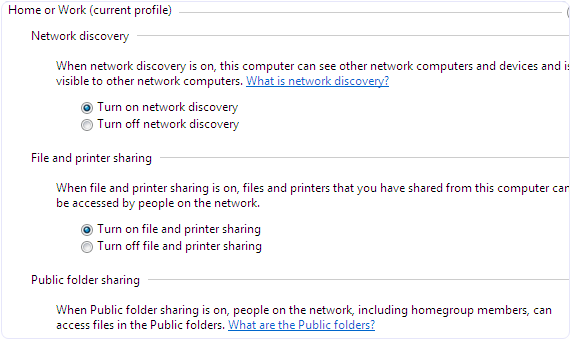
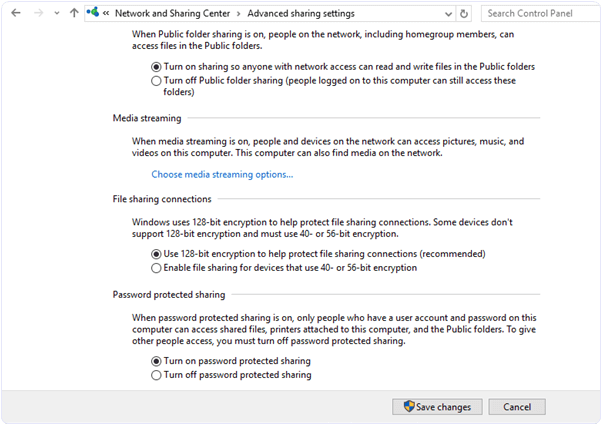
    Step 8. Now open the network and sharing center click on change advanced sharing option. Then tick the radio buttons shown in the images.
    Windows network discovery file sharing media settingsWindows network sharing advances settings
    So these are few steps to connect two laptops using WiFi. By doing this you can easily transfer data from one laptop to another via WiFi. You just need to share that file or folder on network which we had created between laptops.
    Back to Top