New GNS3 Setup With Lower CPU Load and Lower Memory Consumption ..Try It !!!
Showing posts with label Tutorial. Show all posts
Showing posts with label Tutorial. Show all posts
Friday, 25 March 2016
How to Allow MySQL Client to Connect to Remote MySQL server

Issue: How do I allow a MySQL client to connect to a MySQL database server?
Solution: By default, MySQL does not allow remote clients to connect to the MySQL database.
If you try to connect to a remote MySQL database from your client system, you will get the “Host is not allowed to connect to this MySQL server” message as shown below.
$ mysql -h 192.168.1.8 -u root -p
Enter password:
ERROR 1130: Host '192.168.1.4' is not allowed to connect to this MySQL server
You can also validate this by doing telnet to 3306 mysql port as shown below, which will also give the same “host is not allowed to connect to this MySQL server” error message.
$ telnet 192.168.1.8 3306
host 192.168.1.4 is not allowed to connect to this mysql server
If you want to allow a specific client ip-address (for example: 192.168.1.4) to access the MySQL database running on a server, you should execute the following command on the server that is running the MySQL database.
$ mysql -u root -p
Enter password:
mysql> use mysql
mysql> GRANT ALL ON *.* to root@'192.168.1.4' IDENTIFIED BY 'your-root-password';
mysql> FLUSH PRIVILEGES;
Also, update firewall rules to make sure port# 3306 is open on the server that is running the MySQL database.
After the above changes, when you try to connect to the MySQL database from a remote client, you’ll not get the “Host is not allowed to connect to this MySQL server” error message any more.
How to Install vsftpd on Ubuntu and Add New User

Warning: FTP is inherently insecure. If you must use FTP, consider securing your FTP connection with SSL/TLS. Otherwise, it is best to use SFTP, a secure alternative to FTP.
The first two letters of vsftpd stand for "very secure" and the program was built to have strongest protection against possible FTP vulnerabilities.
Step One—Install vsftpd
You can quickly install vsftpd on your virtual private server in the command line:
sudo apt-get install vsftpd
Once the file finishes downloading, the VSFTP will be on your droplet. Generally speaking, it is already configured with a reasonable amount of security. However, it does provide access on your VPS to anonymous users.
Step Two—Configure vsftpd
Once vsftpd is installed, you can adjust the configuration.
Open up the configuration file:
sudo nano /etc/vsftpd.conf
The biggest change you need to make is to switch the Anonymous_enable from YES to NO:
anonymous_enable=NO
Prior to this change, vsftpd allowed anonymous, unidentified users to access the server's files. This is useful if you are seeking to distribute information widely, but may be considered a serious security issue in most other cases.
After that, uncomment the local_enable option, changing it to yes and, additionally, allow the user to write to the directory.
local_enable=YES
write_enable=YES
Finish up by uncommenting command to chroot_local_user. When this line is set to Yes, all the local users will be jailed within their chroot and will be denied access to any other part of the server.
chroot_local_user=YES
Save and Exit that file.
Because of a recent vsftpd upgrade, vsftpd is "refusing to run with writable root inside chroot". A handy way to address this issue to is to take the following steps:
Create a new directory within the user's home directory
mkdir /home/username/files
Change the ownership of that file to root
chown root:root /home/username
Make all necessary changes within the "files" subdirectory
Then, as always, restart:
sudo service vsftpd restart
Step Three—Access the FTP server
Once you have installed the FTP server and configured it to your liking, you can now access it.
You can reach an FTP server in the browser by typing the domain name into the address bar and logging in with the appropriate ID. Keep in mind, you will only be able to access the user's home directory.
ftp://example.com
Alternatively, you can reach the FTP server on your virtual server through the command line by typing:
ftp example.com
Then you can use the word, "exit," to get out of the FTP shell.

Adding New Users To vsftpd
I found it rather strange that there arent any good tutorial that can explain how to add new users to vftpd. Google gives few results but most of them are trial and error method. So i decided to write this post after spending 1 hr trying to accomplish this simple task.
#edit /etc/vsftpd.conf or /opt/etc/vsftpd.conf
Open the vsftpd.conf file and search for chroot_list_enable=YES
Make sure it is YES. Do the same for the following variables
chroot_list_file=/etc/vsftpd.chroot_list or /opt/etc/vsftpd.chroot_list
chroot_list_enable=YES
Save and close the file
Create vsftpd.chroot_list in /etc/ or /opt/etc/
Add the username you want to export to ftp.
IMP: The user must already be a system user with a valid passwd. You must be able to find /home/
If the user you want to add is not a system user then create that user first before editing the above file.
#adduser
#passwd
Restart the vsftpd server using /etc/init.d/vsftpd restart or service vsftpd restart
Now you can log into ftp using the new user.
#edit /etc/vsftpd.conf or /opt/etc/vsftpd.conf
Open the vsftpd.conf file and search for chroot_list_enable=YES
Make sure it is YES. Do the same for the following variables
chroot_list_file=/etc/vsftpd.chroot_list or /opt/etc/vsftpd.chroot_list
chroot_list_enable=YES
Save and close the file
Create vsftpd.chroot_list in /etc/ or /opt/etc/
Add the username you want to export to ftp.
IMP: The user must already be a system user with a valid passwd. You must be able to find /home/
If the user you want to add is not a system user then create that user first before editing the above file.
#adduser
#passwd
Restart the vsftpd server using /etc/init.d/vsftpd restart or service vsftpd restart
Now you can log into ftp using the new user.

How do You Install XvidCap on uBuntu 12.04 Distro
Xvidcap is a small tool to capture things going on on an X-Windows display to either individual frames or an MPEG video. This software is not present in the Ubuntu 12.04 repository by default. You can get a copy of the distributed binary in the form of a .deb package at the following link.

Once you download this package, go ahead and install the package with the following command. The amd64 package given as example is for 64 bit machine.
Once done with setting dependencies, you can then install the Xvidcap package.
https://launchpad.net/ubuntu/precise/amd64/xvidcap/

Once you download this package, go ahead and install the package with the following command. The amd64 package given as example is for 64 bit machine.
$ sudo dpkg -i xvidcap_1.1.7-0.2ubuntu12_amd64In case if the above command fails giving out errors, please note that Xvidcap depends on libavdevice-extra-53 package. So go ahead and install this package first with the following command.
$ sudo apt-get install libavdevice-extra-53By default, the Ubuntu 12.04 comes with libavcodec53 package. This conflicts with the libavdevice-extra-53. In such a case, feel free to go ahead and replace the libavcodec53 package with libavdevice-extra-53. This satisfies the dependency requirement for Xvidcap.
Once done with setting dependencies, you can then install the Xvidcap package.
How To Transfer Data From Android To PC/Laptop Using WIFI
Many times we need to transfer data from our phone to PC/Laptop or vice verse because of to save our personal photos, audios, videos and other files in PC/Laptop or mobile phone. In every day we often connect our phone to computer with the help of USB. But you cannot carry or have USB all the time with you but any situation or time when you have to need to transfers data from computer/laptop to your phone or vice verse in college or any other place then it becomes difficult for it. But don’t worry there is always a solution of every problem so that for this problem a Software Data Cable app is designed for android users to transfers the data from mobile phone to computer or computer to mobile phone without any use of data cable. This app is free of cost and you can download it from Google play store. With the help of this app it becomes easy, fast and secure way to to transfers data. This app can Connect and share everything among phones, Pad, Google TV, Cloud storage, Xbox, PC, Mac, Laptop etc. So here is a simple steps to download and transfers data from android phone to PC/Laptop or vice verse without using data cable.


Best AdNetwork You Must Try
Steps To Transfers Data From Android Phone To PC
#1. First of all you have to an same WiFi network connection on computer or your android phone.
#2. Then simply Download the Software Data Cable app from Google Play Store.
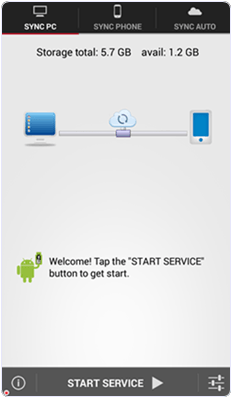
#3. Install the app in your android phone and click on start service.
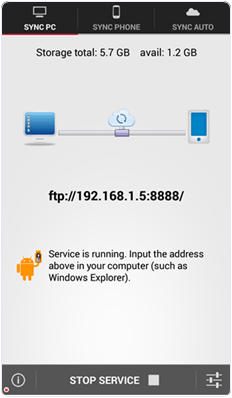
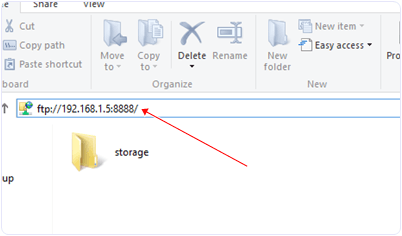
#4. Then it will show you ftp://192.168.1.5:8888 address, simply copy the address or fill into your computer address bar and click OK. It will show you storage folder where your all files stored now you can transfers the data from your android phone to computer or vice verse.
I hope you like this method and find easy to use. In case you have any question please leave your comments below.
How To Make Whatsapp Service Free For Lifetime – 2016
Whatsapp is a most popular and widely used Messenger app on smartphones. Whatsapp is highly downloadable mobile application. Every internet user prefer to use messenger apps like whatsapp instead of doing sms. Their number of best messenger apps for android device. But from all them whatsapp become most popular platform. Even we can download whatsapp on PC. But widely whatsapp is used for texting on mobile. We can easily share files on whatsapp and do texting and calling for with our contacts. But to do chat our contacts must have whatsapp also. Whatsapp messenger is products of Facebook. But the most common issues which are now in trend for whatsapp is, it yearly subscription. We all knowwhatsapp service for lifetime is not available. Whatsapp provide 1 year subscription which we have to extent buy paying $1 for each year as service charge.
Earn Money Use This
How To Make Whatsapp Service Free For Lifetime
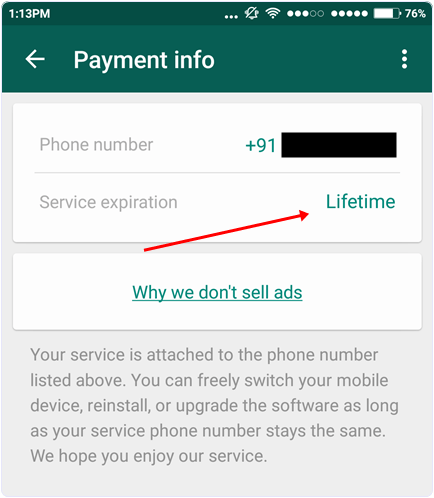
Important Update:- Recently Whatsapp Announced that their are make whatsapp service free for lifetime for all users and also it will stay ad free messenger. So now you don’t need to follow any particular task. If you want to confirm your whatsapp service is free for lifetime or not then you can check at payment info options.
If you are currently using whatsapp on your device then your free service time period should be going on. As You can check your current subscription time period as following.
- Open Your whatsapp account then go to settings tab >> Then Account tab >> Payment info.
- Now Check out your current service expiration time period. If your is any specific date that means it not lifetime. If they shown lifetime then you don’t need worry about anything. As you can see below whatsapp lifetime service screenshot of my account.
- If whatsapp subscription is not currently lifetime then don’t worry. You just need to do these follow small tricky methods.
- First of all you need to understand how whatsapp service time period works.
- Whatsapp service assign mobile number based subscription. That means if 1 mobile number is considered as 1 account. But subscription time period depends on Mobile IMEI number or in other words device to device.
- Now to make your whatsapp service free for particular mobile number. You need to arrange fresh device where whatsapp is never installed. Like you can use your parents, relatives etc who don’t use internet or don’t have any interest in whatsapp. Simply ask them to give you device for 5-10 min.
- Then you need to uninstall whatsapp account using that particular mobile XXXXXwhatsapp number which you make free for lifetime.
- After uninstalling from previous device. Download whatsapp fresh device which you borrow. Then to activate subscription use your current XXXXX mobile number which you want to make lifetime.
- After verifying mobile number then again check your current service time period in payment info. Then 1 year of service time period hopefully should be increased.
- If it not works then try on other devices. Follow this process on 3,4 devices then your whatsapp time period will automatically turns into lifetime period.
Note:- Specially on MI devices changes to make whatsapp lifetime service subscription is more that any other like Samsung or iPhone.
PS:- I know $0.99 is little bit amount and everyone can easily afford. So if your are not interested to do. Then its our own business. Our purpose is to help those who can afford, who are facing problem while paying online. Or young guys whose don’t able to use and many more reasons.
I feel that this method to make whatsapp lifetime service for free which be helpful for you. I hope it works fine because i have tested this method manually to make whatsapp free for lifetime. But some how if its not working then i recommend you to pay services charges to support developers. But if you don’t able to pay then take help from someone who know more about using internet than you to pay for you.
If you like this method then don’t forget share it with your friends.
If you like this method then don’t forget share it with your friends.
How To Use Pendrive As Ram In Windows XP 7 8 10
RAM means random access memory, the main memory of our device which execute each and every process performed. More our device has ram more the speed of run time. That means Ram is the only memory which took load of all the processes occur. Just like we run any application, music file, game all these things are run in temporary memory. If we run number of tasks at same time then you may face not responding problem. Because RAM, Paging and Cache memory is lesser that your current apps requirements. In that condition you need to increase your system ram. Its not possible for everyone to upgrade high grade ram. So the only best possible way for them is to use pendrive as ram.
How you Make Money Online
How To Use Pendrive As Ram In Windows.
Method 1st:- Virtual Ram Concept For Windows XP, 7 and 8
- First of all insert your pendrive.
- Then open “My Computer” and right click >> Then open “Properties”.
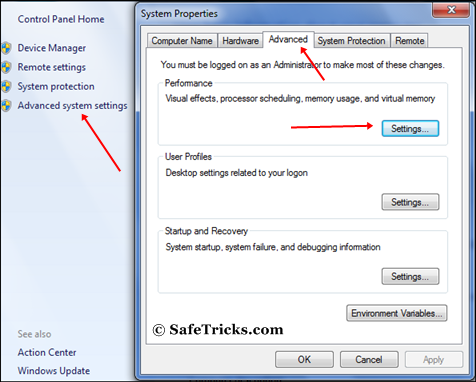
- Now Properties window will appear, then click on “Advanced system settings” from left side.
- Then in “Advanced” tab click on “Settings” button appear in “Performance tab”.
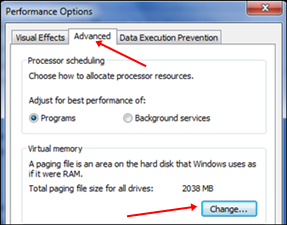
- Again new window will appear then click on “Advanced” tab.
- In advanced tab there is an option of “Virtual Memory box”, then click on “Change Button”.
Process Of Increasing Virtual Ram
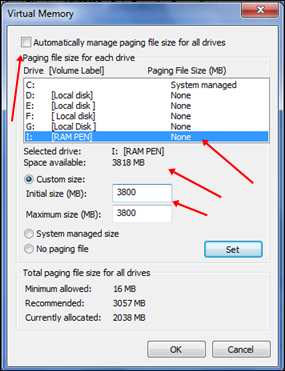
- After click change button “Virtual settings” will appear.
- Now unchecked the box of “Automatically Manage Page Size Feature”.
- Then in custom size add your Pendrive current same in below format.
- NOTE:- IF YOUR PEN DRIVE IS OF SIZE 4GB THEN ALWAYS ADD 10MB LESS FROM CURRENT AVAILABLE SIZE. AS I AM USING PEN DRIVE OF SIZE 4GB AND CURRENT SPACE AVAILABLE IS 3700 MB THEN USE 3690 MINIMUM APPROX OR REMOVE MORE AS YOU CAN BECAUSE IT BETTER OF DEVICE SAFETY.
- Now add same “Value” in both boxes and click on apply button.
- Restart your PC or Laptop and now pendrive will work as “Virtual Ram”.
Important:- If you face problem in above method then can also follow below method which is easy to perform and work on Window 7, 8 and 10.Must Check:- How To Increase Your Internet Speed.Method 2nd:- Increase Ram Using ReadyBoost In Windows 7, 8, 10
- Firstly insert your “Pen Drive” >> Now right click on your pendrive.
- Open “Properties” >> Then “ReadyBoost” tab.
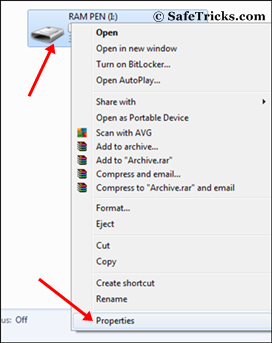
- Then switch to “Use this device” and reduce your current memory space. If your current device place is 3700MB then reduce it with approx 200-300MB.
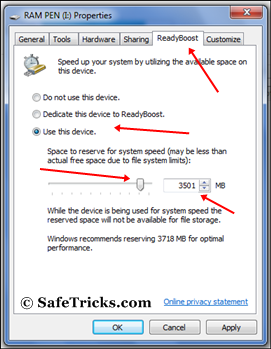
- Then click on Apply button and all Done.
- In case if you want to change back your pendrive to normal. Then switch it back Don’t use device in Readyboost tab.
Important Recommendations:-
- Always safely eject your Pendrive. Direct removal may leads to device damage.
- In Virtual Memory method, If you want to convert back your Pendrive into Normal. Then again open Virtual Settings and remove custom memory value and choose Default settings by checking “Automatically Manage Paging Size”.
- In ReadyBoost method don’t forget to revert back to normal or otherwise open your pendrive and delete Readyboost file from your pendrive.
So these best possible ways to use pendrive as ram in windows and I hope you find them helpful and knowledgeable. In case we missed anything please let us know.
How To Recover Deleted Files From Pendrive & Memory Card
In some cases we accidentally lost our valuable data by formatting the pendrive or memory card mistakenly. Or due to virus programs we lost our data. You can also apply password on pendrive from others. If you do not have the backup of your data and you don’t know how to recover our valuable data then do not worry because in this article we will discuss the best possible method to recover deleted files from pendrive and SD cards.
 Step 1. Download Stellar Phoenix data recovery tool and install it.
Step 2. Choose drive recovery option if you want to recover drive.
Step 3. Select drive from the given list that you want to recover.
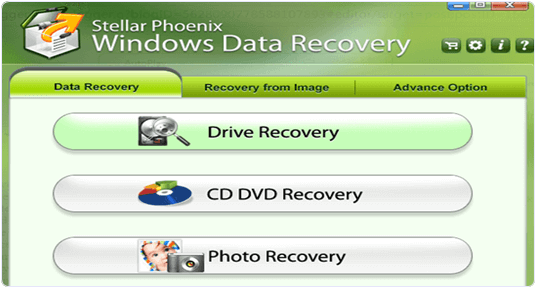 Step 4. After selecting the drive you have to choose delete recovery if you want to recover deleted files.
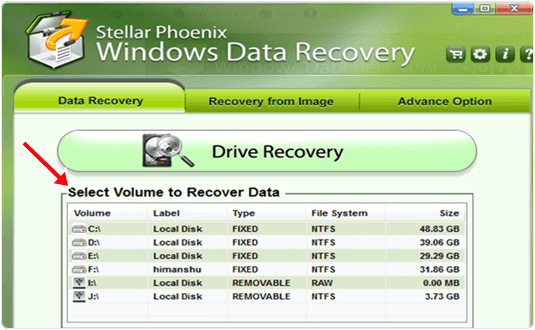 Step 5. Select advance option if you want to recover a formatted drive. Select drive and press scan button.
Step 6. After scanning it will give you a list of deleted files.
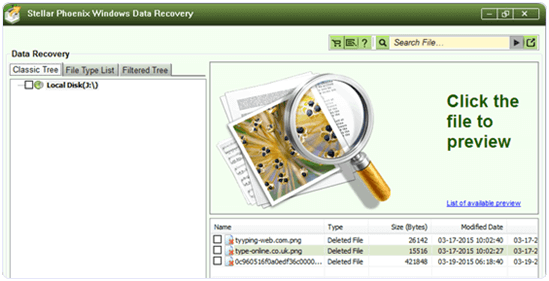 Step 7. Tick the files you want to recover and press recover button.
Step 8. It will save your deleted files in the recovery folder.
Step 1. Download and install Ease-US data recovery.
Step 2. Double click the icon and launch Ease-US data recovery Wizard.
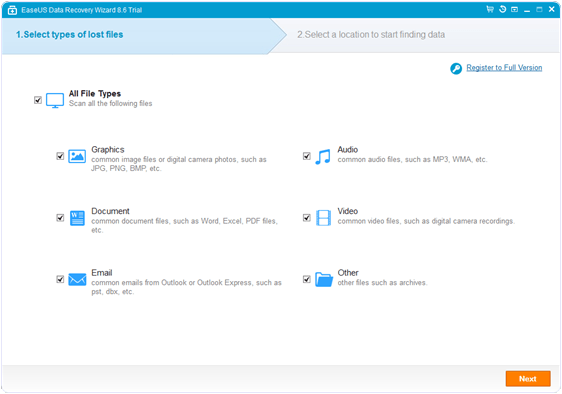
Step 3. Select the types of files you want to recover. Press Next Button.
Make Money from here
Methods To Recover Deleted Files From Pendrive & Memory Card.
1. Stellar Phoenix
Step 1. Download Stellar Phoenix data recovery tool and install it.Step 2. Choose drive recovery option if you want to recover drive.
Step 3. Select drive from the given list that you want to recover.
Step 4. After selecting the drive you have to choose delete recovery if you want to recover deleted files.Step 5. Select advance option if you want to recover a formatted drive. Select drive and press scan button.Step 6. After scanning it will give you a list of deleted files.
Step 7. Tick the files you want to recover and press recover button.Step 8. It will save your deleted files in the recovery folder.
2. Ease-US Data Recovery Software
Step 1. Download and install Ease-US data recovery.Step 2. Double click the icon and launch Ease-US data recovery Wizard.
Step 3. Select the types of files you want to recover. Press Next Button.
Step 4. Select the disk you want to recover and press Scan button.
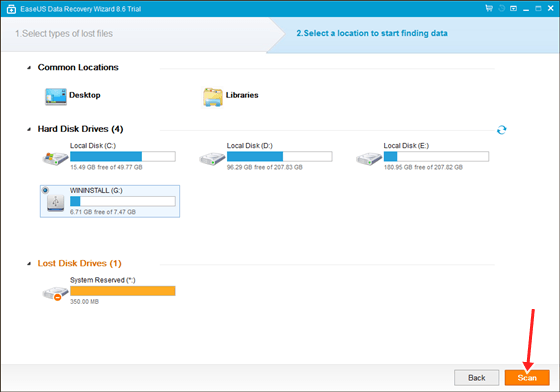
Step 5. If you lost your partition, select Lost Disk Drive and Scan to continue the recovery Process.
Step 6. After Scan you can see the list of deleted files and select those you want to recover.
Step 7. Then Click Recover button to get the files back.
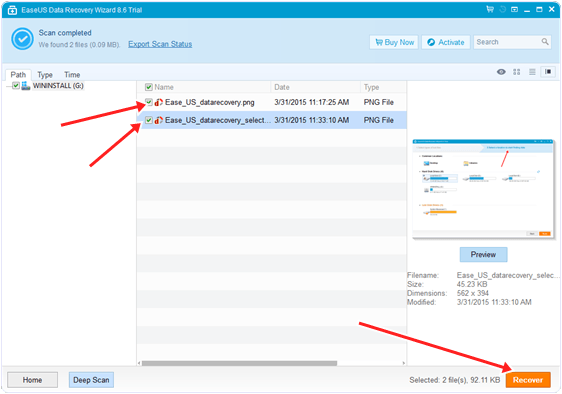
Step 5. If you lost your partition, select Lost Disk Drive and Scan to continue the recovery Process.
Step 6. After Scan you can see the list of deleted files and select those you want to recover.
Step 7. Then Click Recover button to get the files back.
How To Protect USB Pendrive With Password
Desktop or Laptops are become part of our personal and professional life. We use them for entertainment and also for many other purposes. We are know dependent on computer for many different task like we use internet, play games, entertainment, work and more. So due to all these sometimes our device get slow down in speed. So i recommend to read about How To Make Laptop Speed Faster. Usually we store data in computers of multiple type. Due to huge amount of data is store, We need to take backup or we want to transfer them from on device to anther. So use USB devices to exchange data between computers. USB drives are also called pendrive or flash drives. These drives are compact in size and offer large data storage capacity. USB drives are plug and play drives and has more life than CD’s and DVD’s and also provide re-writable features. As we Know USB drives are portable and used to transfer data. Normally USB have good data transfer speed but after passage of time USB get slow down then must check ourHow to increase pendrive data transfer speed.Usb pendrive are used for data transfer. We can even perform various other task with pendrive like we can Use pendrive as ram. Traditionally we CD or DVD disk for installing Now we can easily Make bootable Usb pendrive for windows.Sometimes we need to keep our information secret and protect our data from misuse by others and remain safe. In this article i explain the methods to protect usb pendrive with password.

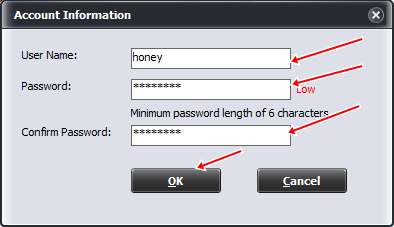
How To Protect USB Pendrive With Password.
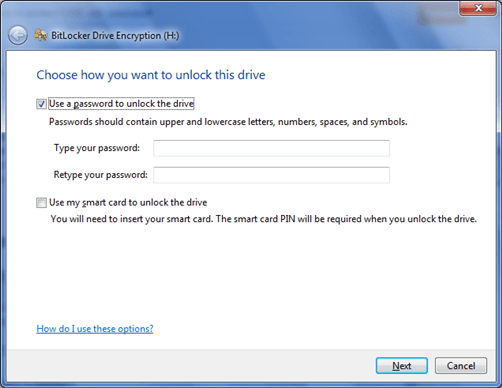
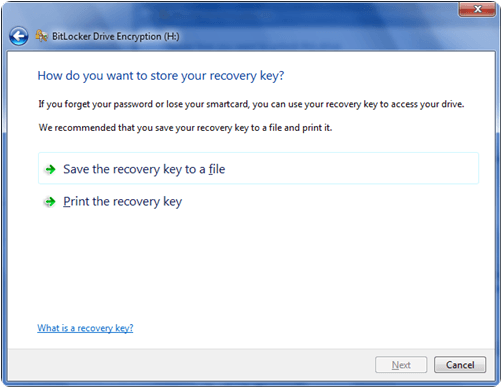
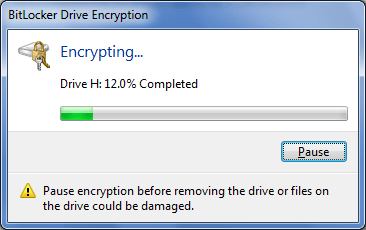
Method 1st:- BitLock Encryption.
Bitlock Encryption is the manual method provided by Windows to protect our USB drive. Each time you insert the pendrive you have to enter the bit lock to open the pendrive and access the files.
Steps To Protect USB Pendrive Using BitLock.
Step 1. Insert your USB into Computer.
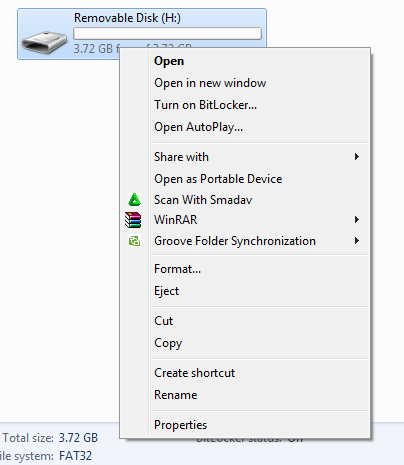
Step 2. Right click the USB drive you want to Encrypt.
Step 3. Select turn on Bitlock from Menu.
Step 4. Tick the check box in front of “use a password to unlock the drive”.
Step 5. Click on next button after entering a password.
Step 6. Next wizard is to save and print Recovery key in case you forgot your password.
Step 7. click on next button and drive encryption will start.
Step 8. After the encryption is complete click on close button.
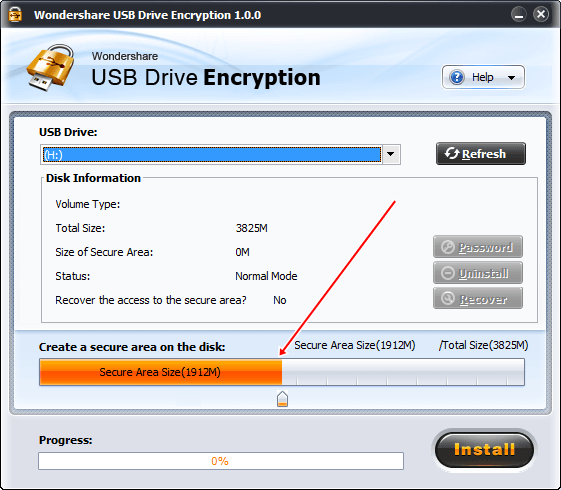
Method 2nd:- Wondershare USB Drive Encryption.
Wondershare USB Drive Encryption is software used to encrypt the USB drive and allow you to use a password to encrypt and decrypt the USB. This software allow you to make a secure area in your drive and you can also protect the whole drive.
Steps To Encrypt USB Pendrive Using Wondershare.
Step 1. Download and install Wondershare USB Encryption software.
Step 2. Double click its icon to Run the Program.
Step 3. Insert your USB into your computer.
Step 4. Select your drive you want encrypt from the list of USB.
Step 2. Double click its icon to Run the Program.
Step 3. Insert your USB into your computer.
Step 4. Select your drive you want encrypt from the list of USB.
Step 5. Select the Amount of volume you want to encrypt and you can also select full amount.
Step 6. Click on Install Button.
Step 7. Enter a user name and Password for Encryption.
Step 7. Enter a user name and Password for Encryption.
Step 8. Click OK to create secure Area.
Step 9. After progress click OK.
So these are some easiest and best way to protect usb pendrive with password. If you have any other best method to protect pendrive with password then must it with us in below given comments.
Thursday, 24 March 2016
How To Stop Wi-Fi Stealing And Catch That Person

Wifi stealing is the common problem we face in our everyday life. It even happens without our knowledge. However the control is in our hand and we can stop wifi stealing using the admin panel of our wifi router.
ften we are unable to locate an uninvited user who uses our Wi-Fi. If someone uses our wifi without our knowledge, that would be termed as wifi stealing.
Whatever be the case, to be on the safer side, we must know who is using my Wi-Fi without my permission and how can we stop them. So, here are the steps on –
How To Stop Wifi Stealing And Catch That Person:
Login to your router.
Different routers support different login styles. So, I am listing a few of the logging in style, out of these, one might work for you:
- Punch in the IP address of your router in your browser address bar directly like 192.168.0.1 or 192.168.1.1
- If the above address does not work, you can also tryrouterlogin.com and it will redirect to your router admin panel.
- Enter the administrator username and password.
- Once you are inside the admin panel, look for menu options like ‘Connected devices’ or ‘Attached devices’.
- If you are able to find that menu, you can see the MAC Address, IP Address and Device name of all the devices which are connected to your network. This is how my Attached devices looks like.
- If you see some extra person’s name or some extra device then they are the one who might be using your wifi without your permission. Read on to know the steps to stop wifi stealing.

How to stop someone from wifi stealing?
Once you come to a conclusion that someone else is making use of your Wi-Fi resources, you can simply change the password of your Wi-Fi to a stronger password. You can also switch off your SSID broadcast.
If you want a stricter action, you can set up a filter based on the MAC address of the devices.
Subscribe to:
Posts (Atom)