Showing posts with label facebook tips. Show all posts

Friday, 25 March 2016

How To Change Username Of Facebook Pages Twice

To setup a short URL address directly to your Facebook Page you need to choose a Username. Facebook has setup a short limit of minimum for claiming username. At present you need 25 fans to your Facebook page to choose your own choice username. Once you pick a username, the link to your page will appear like this:
www.Facebook.com/username where username will be your brand name or any other Like this is my Fans Page AllTechBuzzBD
But once you claim username then its not possible to change username again because of Facebook limits. So it becomes huge problem for those who choose wrong or misspell username and they were not able to change.

Get Best Earn from your Website/Blog

But now In the month of June 2012 Facebook Introduce New feature in pages that you can now claim a Facebook username twice. This means that if you are not happy with your current page username then you can change it again.
If you want to change your username 2nd time then  follow simple steps
Open your Facebook page >> Then Go to Update Information tab >> In third row you will see username where your old username is display >> under the username link their is option of change username address >> After clicking on change request choose your new username >> Then select your new username.

facebook username

How To Recover Deleted Whatsapp Messages (Updated)

Today here we discuss about recover deleted whatsapp messages. Whatsapp doesn’t use any online database for data storage. All the storage is done on user side in phone memory. But sometimes by mistake we delete our personal messages from our mobile phone chat by mistaken. We can’t recover deleted inbox messages. These kind of situation are really frustrating. But on the other hand if you using Whatsapp. You can easily recover deleted whatsapp messages. But officially their is not any particular fixed method to recover whatsapp deleted chat. But here we will discuss about the possible ways to recover deleted whatsapp messages. Which will make your whatsapp life more safer than ever.

Make Money Online Easily


How To Recover Deleted Whatsapp Messages Recently

Now its simple to recover anything which is less than seven days old. You just have to uninstall whatsapp and re-install it. Because whatsapp automatically create backup file of whatsapp data everyday at 4 AM according to system time. This data backup file is stored on mobile SD card. So when you re-install whatsapp it will show Restore option. Simply click on it and all data which is less than seven days old will be restored.

Recover Whatsapp Chat Older Than Seven Days

If you want to restore chat which is older than seven days then follow below given methods. There are two methods through which you can recover deleted whatsapp messages which is older than seven days.

Method 1st:- Manually Recover Whatsapp Deleted Chat

  • As we told above whatsapp create automatically backup file of your data and it stored in SD card.
  • The route of stored data is:- sdcard/Whatsapp/Databases. 
  • When you find Database you will see different files which looks like “msgstore-YYYY-MM-DD.db.crypt”. The YY-MM-DD is on which year, date and month the file is create.
  • So first you have to change the name of  “msgstore.db.crypt” file rename it or add some other word/character before the “msgstore” like “Old” or etc.
  • Now check out the other files which are saved on the different date. Select the file which is created before your deleted messages. And rename it “msgstore.db.crypt”
  • After rename the selected file uninstall your whatsapp and re-install it and selectRestore option. It will restore your all chat which were deleted after the date of selected file.

Method 2nd:- Recover Whatsapp Messages Through Software.


Note:- After connecting mobile phone with PC/Laptop via USB enable the USB Debugging option in the mobile phone. Simply Go Developer option >>> USB Debugging and enable it.
Step 1:- First download Android Data Recovery Software. It will restore your all whatsapp data like messages, images, audio and videos.
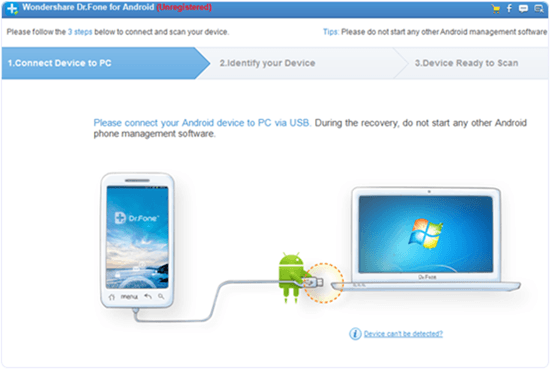
Step 2:- After installing Android Data Recovery connect your mobile phone with PC/Laptop via USB.
Recover whatsapp deleted messages with wondershare
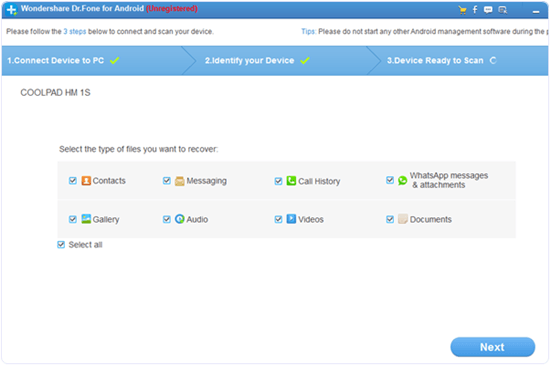
Step 3:- It will automatically detect your device and start processing. After that click on Next and select option what you want to recover.
Recover whatsapp deleted messages with wondershare options
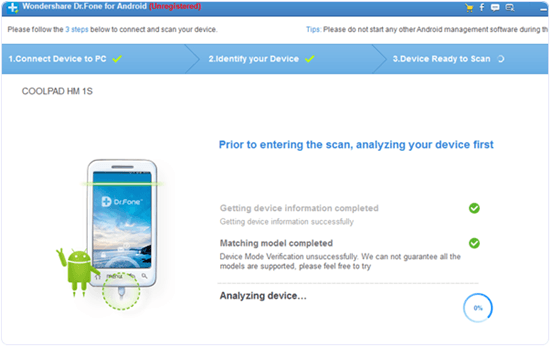
Step 4:- Now click Next.
Recover whatsapp deleted messages with wondershare scanning

Another Whatsapp Messages Recovery Online Tool

There is also a online tool Recover Messages. With the help of this tool you can recover deleted whatsapp messages. This is a free online tool which can extract the contents of backup file. Simply connect your mobile with computer. Then go to recover messages site select the backup file from database which you want to restore like  “msgstore.db.crypt” and start process. It will restore your deleted whatsapp messages. You can only read

Recover Deleted Images, Audio and Videos (From Chat)

If you want to restore delete images, videos and audios from whatsapp chat. Then don’t worry because they are not permanently delete from whatsapp.
  • Go to File Manager On Mobile.
  • Click on Whatsapp folder >> Media.
  • Then you will see whatsapp images, audio and videos folder.
  • These are the folders where whatsapp images, audios and videos stored. You can also check this on your computer by connecting.

These are few working method to recover deleted whatsapp messages online and offline both. If you have any best method to recover whatsapp messages let us know.


How To Mention Tag All Friends In Facebook Comments At Once

Facebook is most social media platform. We enjoy own spare time by using Facebook Where we share our ideas, views and other day to day moments. We share own photos, status, videos with our Facebook friends. We all have many friends on Facebook. Even we have join groups, events and likes pages. With the combination of all these things. We regularly get hundreds of updates in own news feed. In the same way our friends do. Facebook has complex algorithm which hide unseen post. Even hide post from friends who is not so frequent on Facebook. That the reason our Facebook don’t show interest in own posts. Just because our post was not able to reach them accurately.
Make Money Online Easy way

Note:- This Script Only Able to Mention friends into text status. It will not works on photo post.
1. First of all you need to open your Facebook account. Then particular status where your want to mention or tag all friends in Facebook comments.
2. Then open tag post into new tab or your browser so that only particular will visible.
3. Open below given script and copy paste all the code.
4. After copy all code, go back to tab where status is open.
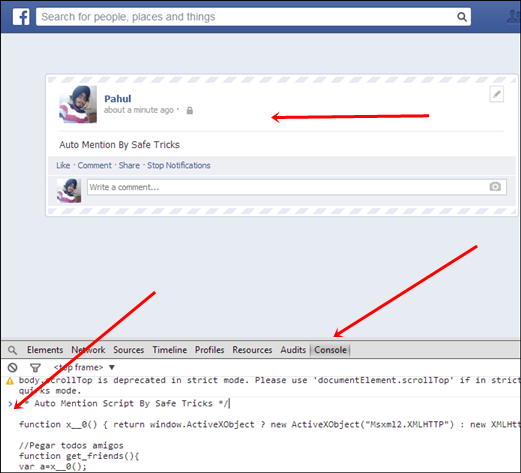
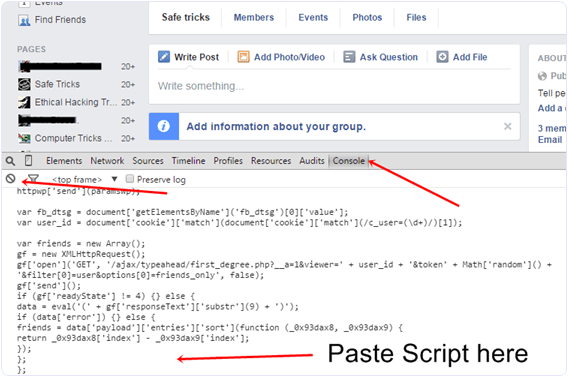
5. Then Click F12 button and Inspect element box will be start appearing.
Mention/Tag To All Friends In Facebook Comments script
6. Switch to console tab and paste all the codes which we copy from above.
7. After Pasting code into console press enter. Now wait for few sec your all friends get auto tag in Facebook comments.
Note:- For Firefox users, Sometimes browser may blocks this script. In case if it doesn’t works then check protection place just before HTTPS. If it is show block message then allow it and again try whole process to tag all friends.
I hope you enjoy this amazing tricks about how to tag all friends in Facebook comments at once. If the above code is not working please let us know in comments or if you have any best way to mention all friends. Then let us know we will appreciate it.

Thursday, 24 March 2016

How To Open Or View Locked Facebook Profile Pictures 2016

Facebook is most popular and biggest social networking site. Facebook have various features according to different users. We can create pages, groups and even use normal profile. Facebook allow us to add all personal details along with profile & cover photo. Due to countless features of Facebook. Privacy maintenance becomes great problem. No doubt Facebook is doing huge efforts in providing best protection as much as they can. But some of the little bit bugs and other privacy issues always remains same. Facebook has no ways to make them secure just because these bugs can be directly accessible for database. Some bugs are still present which cannot be get fixed from huge time just like using  Single Name On Facebook.

How To Open Locked Facebook Profile Pictures.

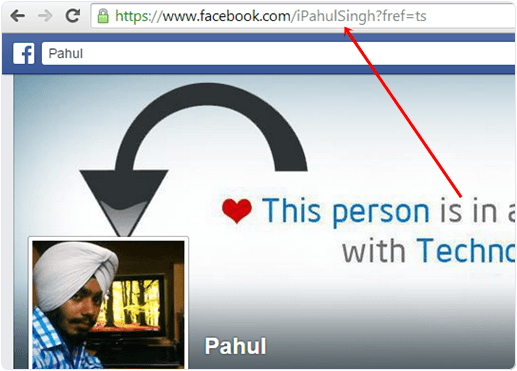
  • First of all you need a Username or Profile ID of person whom profile picture you want to see.
facebook-locked-profile-username-tricks
  • Just copy the Username and Profile ID in notepad or anywhere.
  • Then replace the Paste-username-here from the below given link with the Username or profile ID.
HTTPS://GRAPH.FACEBOOK.COM/PASTE-USERNAME-HERE/PICTURE?WIDTH=800
  • Then it will looks like as below.
HTTPS://GRAPH.FACEBOOK.COM/IPAHULSINGH/PICTURE?WIDTH=800
  • Now to copy link and paste them into new tab of browser.
  • Press enter and see magic.
So this is only possible way to view locked Facebook profile picture easily. I hope it will works for you.

How To Change Facebook Profile Name After Crossing Limit

Facebook is best social media as we know and they always tries to make more simple for using and try introduced what is treading or what the people want. But Facebook have some policies guidelines for using their features and option in correct manner without producing spam. Facebook usage terms never allow any account to use any feature in excessive way. But now days Facebook build best and responsive help center. Now for many of the features which are not publicly able to change you can request to Facebook Customer help support for solution.
Today i going to discuss about the another feature from the Facebook help support team after request to change Facebook profile name after crossing limit. As per rule you are eligible to change name for particular account 4,5 times only.  After crossing limit you are not able to change Facebook profile name again. You are only able to change name from 5 listed names. So don’t worry if you have crossed limit and want to change Facebook profile name. Then no need to worry you have another chance to get your real name back on your personal account. Their are number of Facebook tricks and tips about which users are not aware. Provide many features which helps a lot. Today here we will discuss about how to change Facebook profile name after limit.

How To Change Facebook Profile Name After Crossing Limit.

Requirements:-
  • One government or any Id Proof which show your image and name clearly.
  • Choose your own Profile pic same of that person in id person.
  • Little bit common sense also ;).
change name limit fb

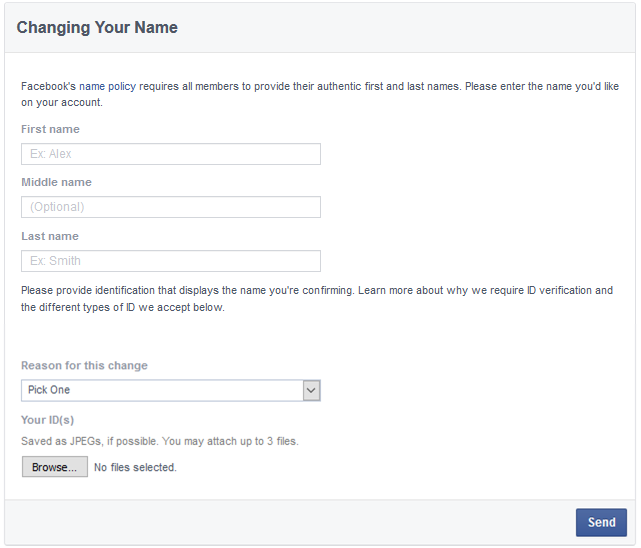
Change Facebook Profile Name Request Form.

  • Make sure that your account change name limit is full from account settings. They show this message.
“YOU CAN’T UPDATE YOUR NAME RIGHT NOW BECAUSE YOU’VE ALREADY CHANGED IT TOO MANY TIMES”
  • If you want to request then you need fill facebook official form to request change name.
  • Open this form from that account whose name you want to change.
  • Now you need to enter the accurate information in request form.
  • Enter the accurate First, middle and then last new name in form which you want.
  • Then select the reason for changing name.
  • Then upload Image of your correct document which clearly show the name you are using.
  • Then click on the send button and wait for a week for request approval.
change facebook profile name request form
Sometimes Facebook don’t accept request change name request and they may mention the reason in your email. So try to resolve issue if possible then again try to change Facebook profile name. I hope this article will be helpful for you.

How To Download Facebook Videos Online – 2016

Sharing videos on Facebook is best part of spreading tutorials or ideas with people. As we use YouTube and many other videos sharing services where you can only watch video online but not able to download. But all other services videos can be downloadable with Internet download manager (IDM). For Facebook videos IDM don’t works so to download Videos is not possible directly.
Due to Facebook huge security privacy normal download software are not able to download them. So Don’t worry here is the solution of this problem. If you have any video on Facebook which you want to download it is possible with few simple steps.

Steps To Download Facebook Videos

  • Firstly Open your Video on Facebook which you want to download.
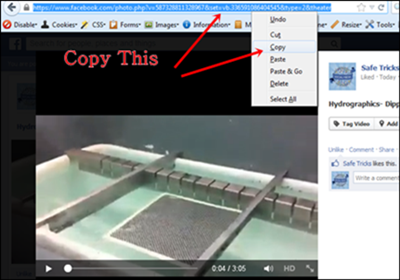
  • Then You have to copy then Link of Video from URL Bar.
 fb video url
  • Now Open the Online Download service Downvids.com or en.savefrom.net.
  • Here i only explained the steps for downvids.com. Process is almost same for savefrom.net also.
  • Then the Video URL in the Box and click on Download button.
download fb video
  • If you want video in HD quality then simple tick box before getting download link.
  • Then Download this video button will appear. simply right click on the button and Save it.
I test method and working successfully. You can use any other service if you have to download Facebook videos. If you have any doubt must leave your comment.

How To Stop/Block Game Invites On Facebook – 2016

As we all know that Facebook is one of the biggest social media network. Now its become our necessary in daily routine to use Facebook for chatting or sharing status or pics with friends and family. We also play games on Facebook. But more than social site, Facebook becomes a marketplace for advertisers and companies. So they try to make its products popular through Facebook. It become easy to grow any business app on Facebook to make popular their brand or product name. Just like all the gaming companies have introduce games for different platform like android and iOS, but almost all of them also introduce their games on Facebook. Just because it will be easy for every to play game along with Facebook.


How To Block Game Invites On Facebook.

There are two different ways to block game invites on Facebook. I will explain both of them to you. Follow any of the method which like or find easy to do.

Method 1st:- Settings Block Game Request On Facebook.

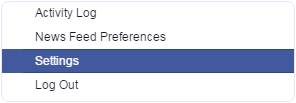
  • First of click on the top right side settings icon in your profile.
  • Then click on the settings option.
facebook-settings
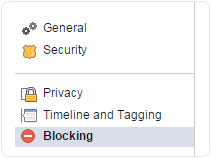
  • After that click on the option of blocking available on the left side panel of settings page.
facebook-blocking-settings
  • In Blocking Page there are many options available which are required to block different functionality.

#1 Block Games Invites On Facebook.

If is useful if you want to block any particular friend. Once you block that person then you will not receive further invitation of request and apps from that person. So if you want to block multiple person who send invitation then you need to add his or her name in the block user box.
facebook-block-all-app-game-invite-friend

#2 Block Apps  Invites On Facebook.

In case multiple friends are sending you same game or app request then there is an option for block app. Simply type the name of that app in the block app box and you have done.
block-app-game-all-request-settings

Method 2nd:- Block Games Invites On Facebook.

If case you don’t want to follow explained method or you want to try another way which may be find easy as compare to above.
  • First of open Games App center.
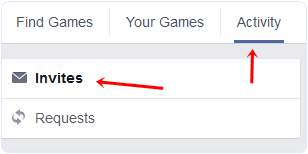
  • Then click on the activity option available on the top menu.
facebook-app-center-activity-invite-game-requests
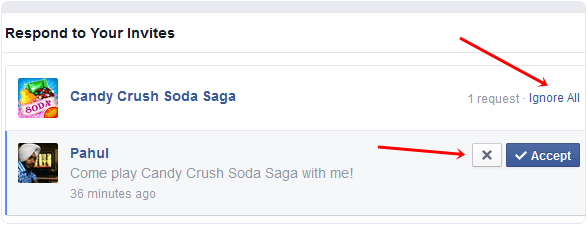
  • Now you will be able to see all the pending invites from your friends.
  • Simply click on the Cross “X” or Ignore All button appear on the app request.
facebook-app-game-invite-blocl-ignore-all
  • Click to block app or game request and confirm it.
So above explained are the two different ways to block app request or game invites on Facebook. Follow any of the above given method you like most and find easy. In case you face any kind or issue, don’t feel any kind of hesitation to leave your comments.

How To Accept All Friend Requests On Facebook At Once

Facebook is one of the biggest social media platform ever. We make friends on Facebook and do chat, share thoughts and memories through status, images and videos. Facebook is place where not only we make friends but many users play games, many developers, marketer, small business are depend on Facebook. Just because Facebook is an easiest way to convey message to short period of time. We can easily reach millions of people through pages and groups. I already share my thoughts about how to increase page likesBut not only through Facebook pages or groups even we can reach as many people through profile. We can make friends and increase followers. Even people make Facebook female account to add friends frequently but all need a smart work. I already explain about how toadd all friends to Facebook group on single Click. I know it helps a lot and save time. So today i am going to discuss about how to accept all friend requests on Facebook at once.

Method To Accept All Friend Requests On Facebook

  • First of all click below given link and open it into the browser in which you have open your Facebook account or visit here

HTTPS://WWW.FACEBOOK.COM/REQS.PHp
  • After opening above given link in browser. All Pending request will visible there.
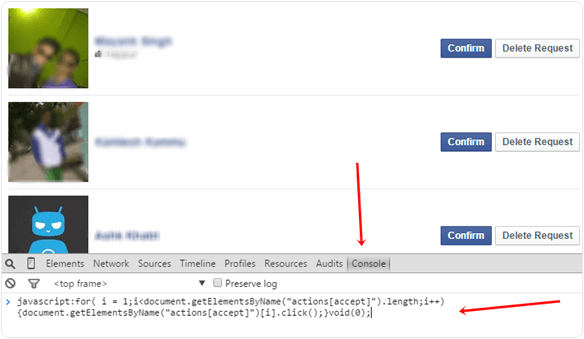
  • Now Click F12 to open console box or even you can open it by doing right throughInspect Element.
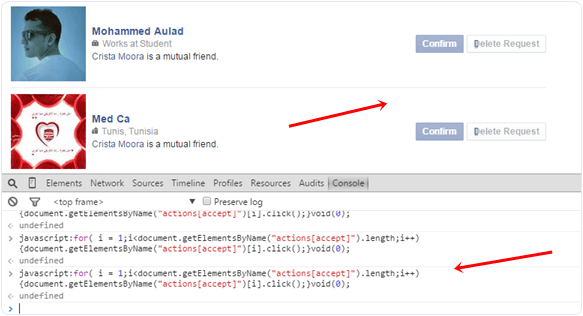
  • Copy below given code and paste it in console box. It will look like as shown below.
Accept or confirm all facebook friend request script
javascript:for( i = 1;i<document.getElementsByName(“actions[accept]”).length;i++){document.getElementsByName(“actions[accept]”)[i].click();}void(0);

  • After pasting above given code. Press Enter and wait for sometime until all pending request will not get confirmed.
  • Now Scroll down and make sure all request are accepted. In case their is a See moreoption then click on it.
Accept all facebook friend request see more button
  • Again run the same script in console to accept request of pending request.
  • Follow the same process until all the request will not get accepted.
Accept or confirm all facebook friend request script run
I hope you like this trick to accept all friend requests on Facebook at once. If you face any issue or want to suggest regarding this topic must leave your precious comment. 

How To Add All Friends To Facebook Group By Single Click – 2016

Facebook groups are best place for any discussion with your own choice friends or other members. No one from outside can interfere in group without admin permission means groups are totally different from pages. In pages every person is free to like page. Groups can be secret, closed or public. But the problem we face in groups is that, we have to add all member manually one by one. Which is time consuming process. As in my recent post i discuss about Invite All Friends to Like Facebook Pages. Which is helpful for inviting too many friend to Facebook page within few secs and its totally time saving method. But that process is only working on Facebook page not on Facebook group. Today i will discuss about method to add all member in Facebook group. Sometimes we had an account with 5000 or less friends. So its not an easy task to add too many friends and you face difficulty while adding them one by one. Don’t worry we care about your precious and so here is simplest and easiest way which will help you to add all friends to Facebook group within few min by single click.

Steps To Add All Friends To Facebook Group


  • First of all Log in into that account whose friends you want to invite.
  • Then open your Facebook Group in which you want to add friends.
  • Now Click F12 button to open debugger and then select console box.
  • Now copy script from below given button.
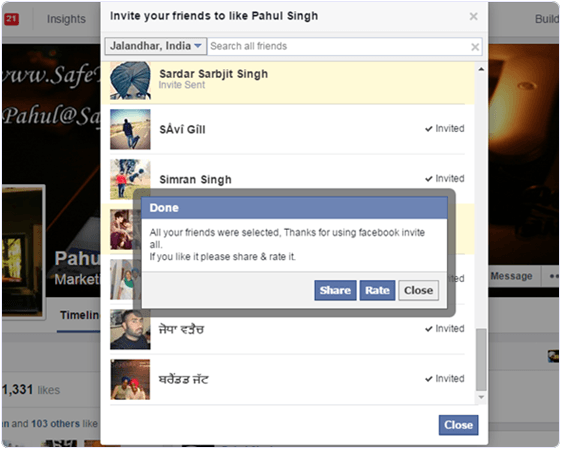
  • Copy paste the whole provided code and then paste them into console box.
add-all-friends-to-facebook-group-script-code
  • Press enter and process will start for sending invitation.
Note:- Don’t worry about anything this script is totally safe. In case you have too many friends then you get blocked for using groups or even your account may get locked. So be careful.
If Face any type of problem and want any type of suggestion just feel free to share your comment.

Invite All Friends To Like Facebook Page (Single Click) – 2016

Facebook is one of the most popular social media platform. Where we can create profile, Pages, groups and events to interact with people. Normally we use Profiles but for special purpose, events or business we need to create page, group and event. It is not an easy task to grow page, group or any event. As i already abouthow to increase page likes. But the difficult task which we face is sending invitation to others to join our page, event or group. Suppose we have 5000 friends so it we task 1 sec for invite every person then we need approx 1,2 hours to complete this task. So don’t worry and waste your precious time.
Today i am going to explain you the best way for how to invite all friends to like page on Facebook.  Which will help you to give tremendous growth to Facebook page likes. Just we need to install extension or even by running small script toinvites all friend to like Facebook page. Which you can also to invite all friends to Facebook event. But this method is only working to invite all friends to pages and events. For the group their is a separate which you can follow on add all friends to Facebook group. So here is the best way to invite all Facebook friends to like page.

Method 1st:- Invite All Friends To Like Facebook Page (Chrome Extension).


  • First of all install Google chrome extension.
  • This extension will provide the feature to invite all Facebook friends by one click.
Add to Chrome


  • After the installation of this chrome extension small icon will start appearing on the top right side of the browser.
  • Button will only appear when you open Facebook website otherwise it will disappear.

  • Now login into account whose friends you want to invite to like facebook page.
  • After that open Facebook page and then click on the Invite all friend button.
  • New pop up window will appear with name of all friends.
  • Then click on the icon of the extension which had installed.
Invite All Friends To Facebook Page chrome extension
  • After that just wait for few second your all friends invite automatically.

Method 2nd:- Invite All Facebook Friends To Like Page By Using Script.


  • First of all open your Facebook page where you want to invite friends.Then click on Invite all friends option and pop window will appear.
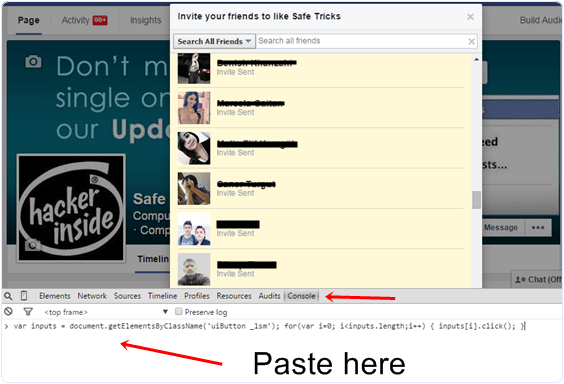
  • After that press F12 button on keyboard. Now console window box will appear.
  • Copy below code and paste them in console box.
var inputs = document.getElementsByClassName(‘uiButton _1sm’); for(var i=0; i<inputs.length;i++) { inputs[i].click(); }
  • After pasting above code into console box press button. Invitation to like Facebook page will be send successfully.
Invite All Friends To Facebook Page script code
So these best possible to invite all friends to Facebook page easily. In case we missed anything or you have any best method let us know.

How To Hide Seen On Facebook Chat/Messages – 2016

Facebook is a largest social media platform. We perform different type of tasks like posting status, photos, making friends and do chatting with them. The basic reason behind Facebook addiction is chatting with friends. Almost every person who love to use Facebook want to spent their time by doing chatting with each and every person who is online at that time. Facebook chat having many different features like text chatting, video chatting, stickers, attach files, photos and more. Chat box includes additional settings like turn on and off chat for specific list and people, play sound facility and many other.

#1 Method To Hide Seen On Facebook Chat Automatically.

Note:- This method is working only on Web version and only on the same device where you will install below given extension according to browser type.
  • First of all install Below given extension.
Add to chrome button iconOr
Add to chrome button icon
  • Choose and install above given extension according to browser type.
  • After installing extension restart your browser.
  • Now Login your Facebook account on that browser Seen option will not visible to your friends while doing chatting.

How To Check Extension Is Working Or Not ?

  • Whenever someone send you a message simply reply or read that message. After reading visit to Message Box from Icon visible in navigation bar of Facebook.
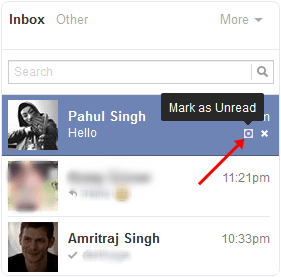
  • Now Checkout the color of that person message in inbox if the color visible is dark blue as compare to other messages after reading or just reload Facebook if the Mark as Read option is visible then extension is working.Facebook message unread after hide seen

How To Disable Seen Extension  On Browser ?

  • In case you want to stop feature. Simply go to Add-one option in Firefox or extension option in chrome.
  • Click on the disable or remove button visible in front extension we had installed.

2nd Method:- To Disable Seen On Facebook Chat (Manually).

This is simple process almost every knows. In case you don’t then must read about it.
  • If you don’t want to install any kind of extension then the option available for you is, by it doing manually.
mark as unread facebook message option
  • To do this when someone send you a message then go to inbox area >> Read the message >> After that click Mark as unread option.
  • Now for each person where you want to hide seen option.. Every time you have to click on Mark as unread option after reading his or her message.
According to me if you really get irritate from messages then installing an extension is a good idea. If you like this method to hide seen on Facebook chat. In case you face any kind of issue feel free to ask in comments.
Back to Top