Showing posts with label Wifi Hotspot. Show all posts

Friday, 25 March 2016

How To Transfer Data From Android To PC/Laptop Using WIFI

Many times we need to transfer data from our phone to PC/Laptop or vice verse because of to save our personal photos, audios, videos and other files in PC/Laptop or mobile phone. In every day we often connect our phone to computer with the help of USB. But you cannot carry or have USB all the time with you but any situation or time when you have to need to transfers data from computer/laptop to your phone  or vice verse in college or any other place then it becomes difficult for it. But don’t worry there is always a solution of every problem so that for this problem a Software Data Cable app is designed for android users to transfers the data from mobile phone to computer or computer to mobile phone without any use of data cable. This app is free of cost and you can download it from Google play store. With the help of this app it becomes easy, fast and secure way to to transfers data.  This app can Connect and share everything among phones, Pad, Google TV, Cloud storage, Xbox, PC, Mac, Laptop etc. So here is a simple steps to download and transfers data from android phone to PC/Laptop or vice verse without using data cable.


Best AdNetwork You Must Try


Steps To Transfers Data From Android Phone To PC


#1. First of all you have to an same WiFi network connection on computer or your android phone.
#2. Then simply Download the Software Data Cable app from Google Play Store.
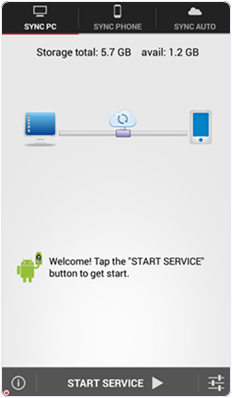
Download Software Data Cable App
download-Pepsi-Skate-3D-sync-data
#3. Install the app in your android phone and click on start service.
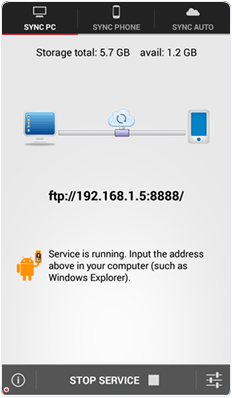
download-Pepsi-Skate-3D-ip-address
#4. Then it will show you ftp://192.168.1.5:8888 address, simply copy the address or fill into your computer address bar and click OK. It will show you storage folder where your all files stored now  you can transfers the data from your android phone to computer or vice verse.
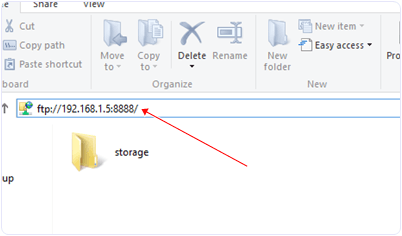
ip-address-in-my-computer
I hope you like this method and find easy to use. In case you have any question please leave your comments below.
How To Transfer Data/Connect Two Laptops Using WIFI

As we can share data between two laptop devices with LAN cable easily. Sometimes we are not in the state to access LAN cable. In that situation we need to transfer large data. Then best possible solution is to connect two laptops using WiFi network. Even connecting device wirelessly is easy and we can move design where we feel comfortable. As we ready explained about transfer data from android to laptop using Wifi. In the same way we can also connect two laptops using WiFi easily. We just need to make a small adhoc network to share files with others. Laptops has wireless cards so with the helps of laptops we can create an adhoc network without any wireless WiFi router. Even we can use our mobile hotspot to create wireless network between laptops. If you do not know how to configure a wireless network then this post is really for you. Here we are going to discuss about how to connect two laptops using WiFi. Which is really and best way to create wireless network between two laptop.
Make Money From Here


How To Connect Two Laptops Using WiFi.

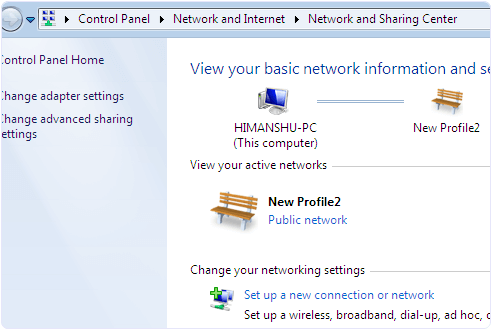
Step 1. Open the control panel and then click on Network and internet option. Then you see the network and sharing option. Open it.
Step 2. Now you see the Network and sharing Window with many options. You have to click on the setup a new connection.Windows network and sharing settings for wifi connection
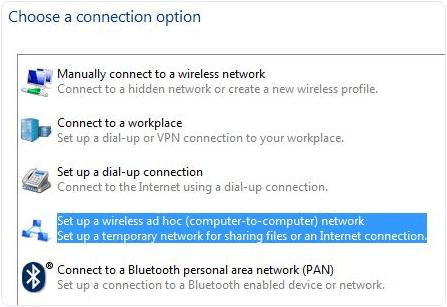
Step 3. Now you see a choose connection option Dialog. In the dialog look for set up wireless and adhoc network.
Set up wireless connection network windows
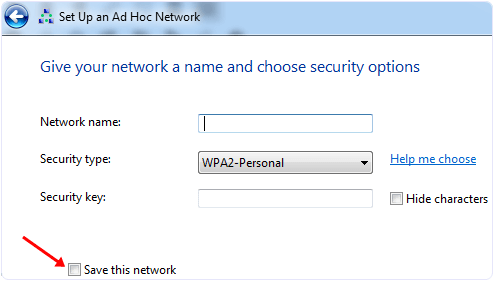
Step 4. Now you can see the next window with Network name, security type and security key option.
Step 5. Now you have to give a name to your network and choose a security option. The default security option is WPA2-Personal which is stronger.
Set up adhoc network on windows
Step 6. You can also leave the security option with no authentication and WEP.
Step 7. Do not forget to tick the checkbox with save this network option. If you don’t tick the option then after disconnecting the network you have to configure the network again.
Now your wireless network is ready and shown with other networks. Click on your network to connect. After connecting you will see a message at right hand side of network name waiting for users.
Now you have to share data among Wireless Network.

Workgroup Sharing Settings.

If your Laptops have different OS then you have to use the Workgroup sharing option because, this option can share data among similar and different OS.
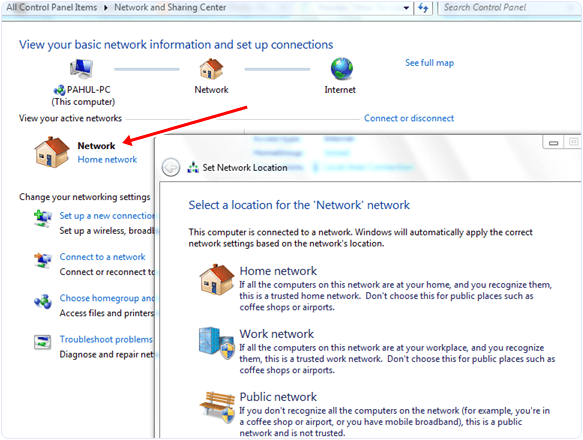
Step 1. First you need to check adhoc network you created, its network type should be Home or work.
Step 2. If not then open the network and sharing center then click on the name of network if it says home network then you do not need to change the network type otherwise you have to select home network.
Windows workgroup network location settings
Step 3. This setting allow you to share your data with other computers. Other thing you need to check is that all the computers are in the same workgroup.
Step 4. In Windows XP you can change Workgroup setting by right clicking on My Computer and select properties. Look for system properties and click on the Computer Name tab to change the settings.
Step 5. In Windows Vista and higher versions right click on computer and click on properties. You can change this settings in Computer name, Domain name and workgroup settings section.
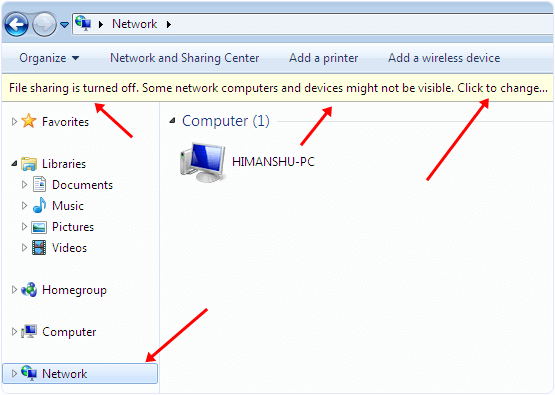
Step 6. Last thing that we should apply to Windows 7 PC from which we want to access other computer is to open the Explorer and click on the Network option.
Windows file sharing settings on network
Step 7. After that you see a popup bar with Network discovery and file sharing are turn off. Network computers and devices are not visible. Turn on this settings to allow sharing of resources.
Follow the above steps to all the network computers to allow sharing with them.
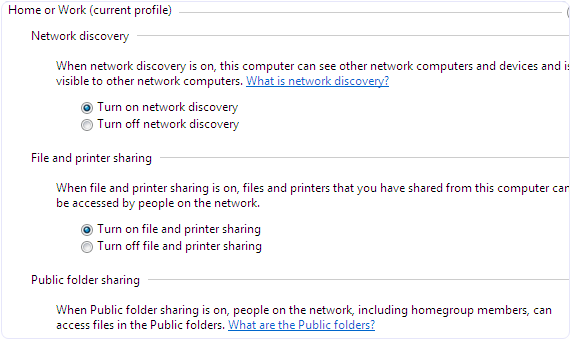
Step 8. Now open the network and sharing center click on change advanced sharing option. Then tick the radio buttons shown in the images.
Windows network discovery file sharing media settingsWindows network sharing advances settings
So these are few steps to connect two laptops using WiFi. By doing this you can easily transfer data from one laptop to another via WiFi. You just need to share that file or folder on network which we had created between laptops.

Thursday, 24 March 2016

How To Create Wifi Hotspot In Windows Laptop Or PC

As we all know 21st century is an era of Internet. An Internet is a fast growing technology which provides every information in all over the world, you have to just search it on internet and you can find  information  related on any topic. With the increasing of new technologies Mobile phones, tablets are also growing very fast within the few decades. If you have a WiFi enable mobile phone, Tablet or an Ipad then you can easily connect your devices to available WiFi network in the public place, office or in the college, but in the home mostly people have only single connection (wired internet connections) or have not  WiFi router. Don’t worry, you can also connect your devices with your internet without any help of WiFi router. You have to just create an WiFi hotspot connection in your PC or Laptop. To Create WiFi Hotspot in Windows is not a very difficult task. You can easily create WiFi hotspot in your windows PC or Laptop by just doing simple steps which we discuss below.

Method 1:- How To Create WiFi Hotspot With Software.

In this method firstly you have to download software. After installing the software it will tell you creating your WiFi Hotspot username and password. Simply just create username and password according to you. Then click on start or activate button it will automatically create to you WiFi Hotspot, next whenever any user want to access your WiFi hotspot they have to put password first which is provided by you then they can access your WiFi hotspot network. So its just simple method and you can easily create a WiFi hotspot access point on your windows 7/8/8.1 PC or Laptop and you do not have to use any WiFi router.  So here we provide two software’s which is best and free for creating WiFi Hotspot on you PC or Laptop.

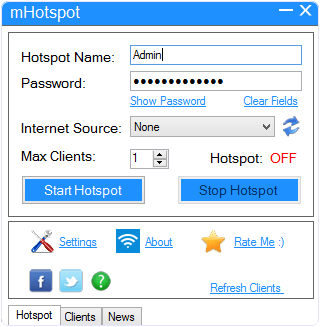
#1 mhotspot.
mHotspot is an free and easy method to create WiFi Hotspots with WiFi enable windows 7/8/8.1 on PC or Laptop. This software converts your computer or laptop windows into virtual WiFi router which can connect upto 10 devices. You can also share any type of internet connection including 3G/4G, LAN and Ethernet with the fully secured connection.
mHotspot
  • It is easy to use.
  • Security Features:- WPS, WPA2 and WEP password security.
  • The mHotspot also shows the number of devices connected, you can see sent and received data, and other log data.
OR USE
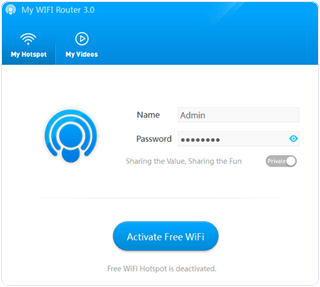
My WiFi router is another free software which converts your windows 7 & 8 PC/Laptop into WiFi hotspots. You can share the internet easily with My WiFi router software anywhere and anytime. Just download and install the software and place a your username and password according to you and click on activate button.
My WiFi Router
  • It is easy to create a secure WiFi hotspot with My WiFi router.
  • Share internet any kind of internet connection (3G/4G, Ethernet & LAN).
  • You can display and manage the connected devices(limit internet speed, blocklist).
  • You can extend your WiFi range.
Note:- Those who have desktop PC they have to first buy Bluetooth device then they will be able to create WiFi hotspot either they will not be able to create.

Method 2:- How To Create WiFi Hotspot With CMD.

In this method we will explain you that how to create WiFi hotspot in windows 7/8/8.1 PC or Laptop through command prompt. These are the simple steps to create WiFi hotspot.

Step 1:- Enable the Microsoft Virtual WiFi Miniport Adaptor.

  • To enable this first open “RUN” dialogue box using (“Window Key”+”R”).
  • After open the Run dialogue box type in it “cmd”. It will open your command prompt or in case you are not able to find by this way simply search at start for cmd you will easily get.
  • Run the command prompt under Administrator privileges by doing right click on cmd and select  (Run as Administrator) .
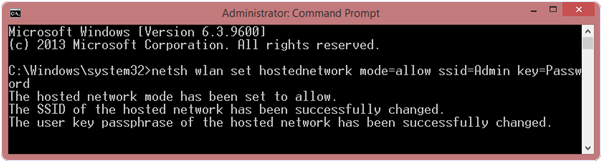
  • Once the command prompt open type in the below given command.
NETSH WLAN SET HOSTEDNETWORK MODE=ALLOW SSID=HOTSPOT KEY=PASSWORD 
command to create WiFi hotspot in windows PC or laptop
#1 SSID is your username that will show on the connection.
#2 Key is the password of your WiFi Hotspot connection.
#3 You can also create SSID and Key accroding to you !.

Step 2:- Starting WiFi Hotspot Connection.

  • After creating Hosted Network next you have to start it.
  • For starting WiFi hotspot connection, type in the command prompt given below command.
NETSH WLAN START HOSTED NETWORK
command to create WiFi hotspot in windows PC or laptop

Step 3:- Configuring Microsoft Virtual WiFi Miniport Adapter.

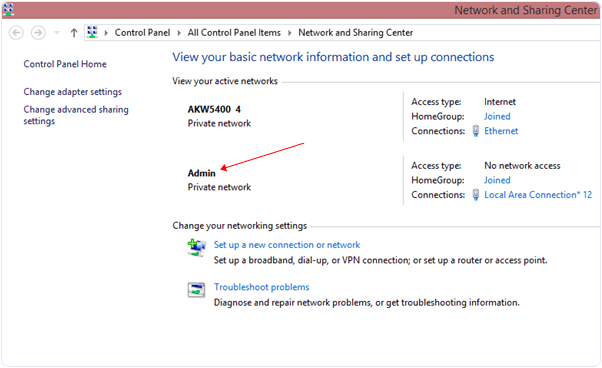
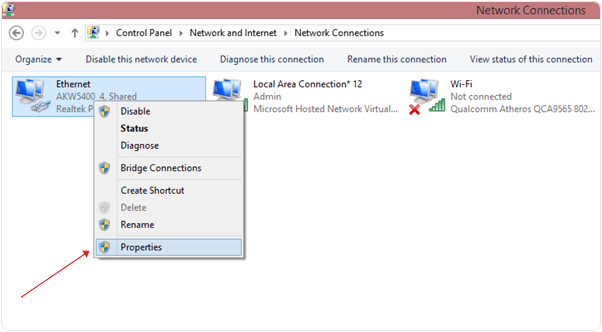
  • Go to Network and Sharing Center where you will see your created network.
  • Next go to right side and you will see change adapter setting click on it.
windows network and sharing
  • Then click on the Ethernet >> Properties.
ethernet properties
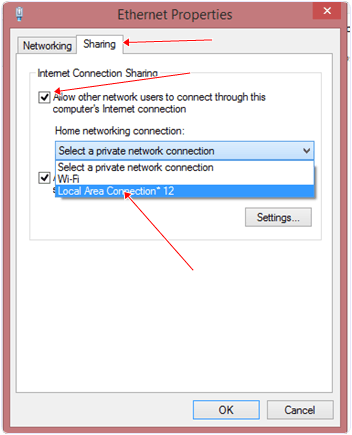
  • It will show you new dialogue box. Click on Sharing >> Tick on Allow network user. As show in the given image.
  • Select Local Area Connection*12 which we created.
  • And then click ok.
ethernet properties for wifi hotspot

Some Other Commands.

  • If you want to stop network connection then simply open your command prompt under administrator privileges and type below give command.
NETSH WLAN STOP HOSTEDNETWORK 
  • Or if you want to change your network Password then type below given command in the command prompt.
NETSH WLAN REFRESH HOSTEDNETWORKYOURNEWPASSWORD
Back to Top