Showing posts with label windows 10. Show all posts

Friday, 25 March 2016

How To Use Pendrive As Ram In Windows XP 7 8 10

RAM means random access memory, the main memory of our device which execute each and every process performed. More our device has ram more the speed of run time. That means Ram is the only memory which took load of all the processes occur. Just like we run any application, music file, game all these things are run in temporary memory. If we run number of tasks at same time then you may face not responding problem. Because RAM, Paging and Cache memory is lesser that your current apps requirements. In that condition you need to increase your system ram. Its not possible for everyone to upgrade high grade ram. So the only best possible way for them is to use pendrive as ram.


How you Make Money Online 

How To Use Pendrive As Ram In Windows.


Method 1st:- Virtual Ram Concept For Windows XP, 7 and 8

  1. First of all insert your pendrive.
  2. Then open “My Computer” and right click >> Then open “Properties”.
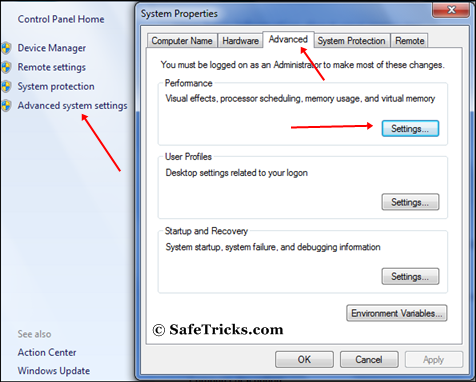
  3. Now Properties window will appear, then click on “Advanced system settings” from left side.
  4. Then in “Advanced” tab click on “Settings” button appear in “Performance tab”.
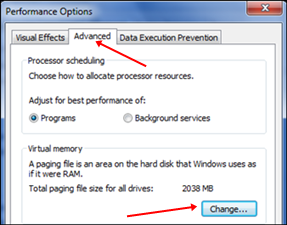
  5. Again new window will appear then click on “Advanced” tab.
  6. In advanced tab there is an option of “Virtual Memory box”, then click on “Change Button”.
windows system settings for virtual ramwindows performance option for virtual ram
Process Of Increasing Virtual Ram

  • After click change button “Virtual settings” will appear.
  • Now unchecked the box of  “Automatically Manage Page Size Feature”.
  • Then in custom  size add your Pendrive current same in below format. 
  • NOTE:- IF YOUR PEN DRIVE IS OF SIZE 4GB THEN ALWAYS ADD 10MB LESS FROM CURRENT AVAILABLE SIZE. AS I AM USING PEN DRIVE OF SIZE 4GB AND CURRENT SPACE AVAILABLE IS 3700 MB THEN USE 3690 MINIMUM APPROX OR REMOVE MORE AS YOU CAN BECAUSE IT BETTER OF DEVICE SAFETY.
    • Now add same “Value” in both boxes and click on apply button.
    • Restart your PC or Laptop and now pendrive will work as “Virtual Ram”.
    Important:- If you face problem in above method then can also follow below method which is easy to perform and work on Window 7, 8 and 10.

    Method 2nd:- Increase Ram Using ReadyBoost In Windows 7, 8, 10

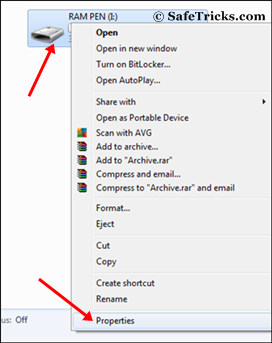
    • Firstly insert your “Pen Drive” >> Now right click on your pendrive.
    • Open “Properties” >> Then “ReadyBoost” tab.
    PenDrive Properties
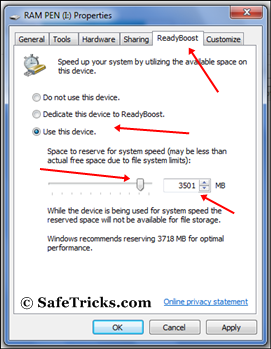
    •  Then switch to “Use this device” and reduce your current memory space. If your current device place is 3700MB then reduce it with approx 200-300MB.
    Pendrive Readyboost
    • Then click on Apply button and all Done.
    • In case if you want to change back your pendrive to normal. Then switch it back Don’t use device in Readyboost tab.

    Important Recommendations:-

    • Always safely eject your Pendrive. Direct removal may leads to device damage.
    • In Virtual Memory method, If you want to convert back your Pendrive into Normal. Then again open Virtual Settings and remove custom memory value and choose Default settings by checking “Automatically Manage Paging Size”.
    • In ReadyBoost method don’t forget to revert back to normal or otherwise open your pendrive and delete Readyboost file from your pendrive.
    So these best possible ways to use pendrive as ram in windows and I hope you find them helpful and knowledgeable. In case we missed anything please let us know.

Wednesday, 23 March 2016

How To Stop/Disable Windows 10 Updates

Microsoft release its new Windows 10 with its latest features and attractive look. Windows 10 becomes popular because it is free to install and user can update it from any of previous version of Windows. Windows 10 provide multiple desktop, that is each desktop with a separate task. New users of Windows 10 also like its personal assistant called cortana.

Method 1st :- Disable Windows 10 Updates From Services.

Step 1. To stop the windows 10 updates you should first go to the control panel.
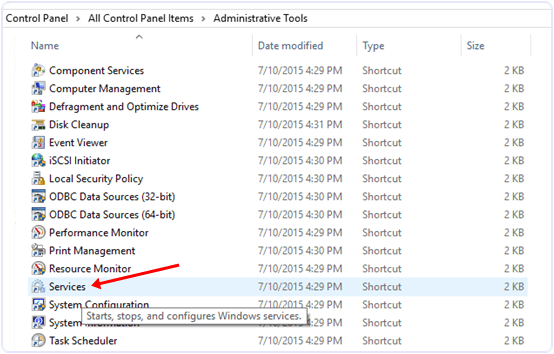
Step 2. In the control panel go to Administrative tools.
Stop Windows 10 updates control panel
Step 3. Then look for services option.
adminstrative tools services
Step 4. In the services window you will see many types of windows services running.
Step 5. In this window scroll down and to find windows update service and turn off it.
control panel adminstrative tools services windows update service
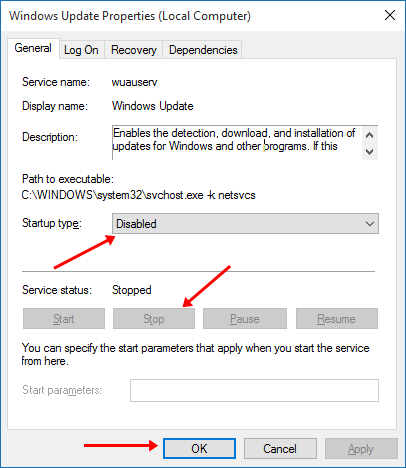
Step 6. To turn of this service you have to right click on the service and click on the properties option.
Step 7. In the properties options select general setting.
Step 8. In the general setting look for start up type option and select disable option.
Step 9. After that look for service running status and click stop button.
Step 10. Click on OK and your automatic updates will stop after that.
disable windows 10 updates properties settings
Method 2nd:- Disable Windows 10 Updates From Network Settings.
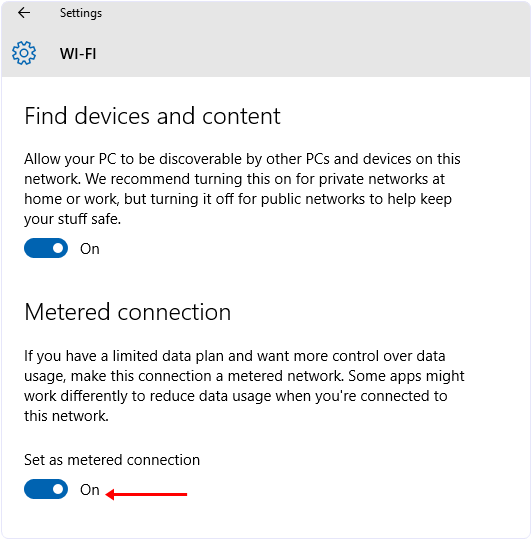
If you have limited internet connection and you want to stop automatic updates of Windows 10 and other Application then you can take advantages of Windows 10 Amazing feature called metered internet connection. By using this feature you can stop Applications and Windows from updates. To set your internet connection as metered you have to follow the below steps.
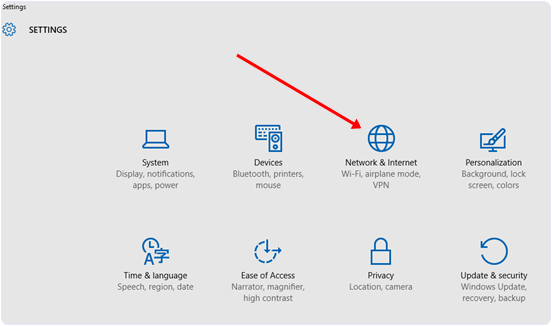
Step 1. Open the settings Apps in Windows 10.
Step 2. After that select Network & Internet.
Stop Windows 10 update settings
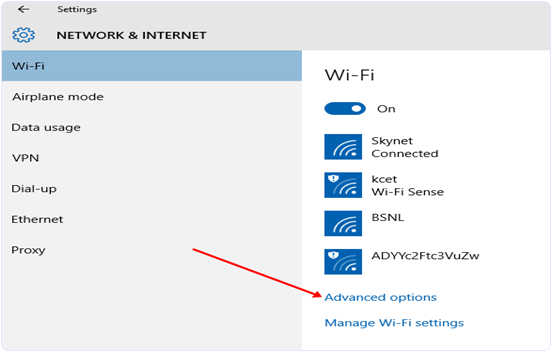
Step 3. After that Scroll down and look for Advanced options.
Stop Windows 10 updates advanced option
 
Step 4. Then select the Set as metered connection option.
Stop Windows 10 updates setting meter connection
Step 5. Now this option will be set for all WiFi Network.So these are some best possible ways to turn of windows 10 updates. In case you have any problem or you know any other best method let us know. 

Tuesday, 22 March 2016

How to Create an ISO Image of Your Windows System

Need a quick and easy way to backup and restore Windows without relying on backup tools or the cloud for your personal data? While plenty of third partyWindows backup and restore tools are available, it’s time to learn how to make an ISO image of your Windows PC.

Images vs. Backups

We all know that backing up our data is important, especially when upgrading to a new version of Windows. But rather than fiddle around with partitions purely for personal data, or cloud storage, which might be slow to restore your vital files and folders, wouldn’t it be great to be able to simply take a backup of your entire Windows installation?
backup-key
Such a backup might be configured to include your personal folders, but omit apps and games, or you could opt to create an image of your entire system drive. Naturally, you would need a suitable volume of storage for such a backup.
Thanks to the ISO image format, it is possible to back up your data – essentially create an exact copy of your entire drive or selected directories – and restore it relatively quickly should disaster strike. ISO files can also be used to back up existing CDs and DVDs, a useful means of reducing reliance on physical media.

Images and Disk Upgrade or Replacement

One popular use for disk images is creating a clone of your hard storage (hard disk drive or solid state drive), which might be on its last legs.
DataNumen Disk Image is one such solution, runs on all versions of Windows and is available as freeware. Known as DDKI, this solution is straightforward. After downloading and installing the utility, use the Clone tab to select the drive you wish to make an image of; to clone multiple drives, use the Batch Clone tab.
muo-windows-makeISO-ddki
Select the destination location and assign a filename in the Output image file asbox, where you should select the target disk drive – the device purchased to replace the old HDD.
Begin by clicking Start Cloning. When complete, your disc will be copied to its destination device, ready to use. Our look at HDD cloning covers the topic in greater depth.

Create an ISO Before Upgrading to Windows 10

Creating an ISO image of your Windows installation is a great solution to any concerns you might have about upgrading to Windows 10.
Worried your PC may not boot after the upgrade? Heard horror stories from your friends at work? While issues with a Windows 10 upgrade are unusual, they can beutterly frustrating, and often when upgrading from Windows 7 and 8, it isn’t possible to automatically roll back the installation.
This is where an ISO image comes in.
You might alternatively have already upgraded to Windows 10, and want to create an ISO image before you downgrade to Windows 7 or Windows 8.1.

Creating an ISO Disk Image in Windows 7

While Microsoft may recommend you backup your files rather than rely on complete system images, there’s no reason not to have an ISO disk image ready for a disaster recovery scenario. This might be an image of the system in its current state, or of a freshly installed Windows 7, complete with all of the apps you regularly need (such as Microsoft Office, perhaps). Backing up to an ISO disk image is part of theWindows 7 backup and restore feature.
To create a system image in Windows 7, open Start > Getting Started and thenBack up your files. On the left-hand pane, click Create a system image, and select the destination.
muo-windows-makeISO-create-image
This might be an external hard disk drive or some other large volume. Multiple DVDs can be written to, if necessary, or if you have a Blu-ray writer, this should also be an option.
Do you have a home server, or some large storage on your network, perhaps in the shape of a purchased NAS (or a DIY device, perhaps using a Raspberry Pi)? If so, you can use the On a network location option. If you want to use a USB flash device, connect this to your computer in advance and select it as the destination – or use one of these bootable USB tools.
muo-w8-recovery-usb
With your selection made, it is time to select the drives to include in the backup. It is unusual for multiple drives to be required, but in most cases you will need to ensure that the System drive (by default the C: drive) is selected. The device you selected for the backup will not be listed here.
The confirmation screen will detail how much space will be taken up by the backup. Check this to ensure the figure matches the remaining space on the target device. Proceed with the backup, and wait while it completes; the duration will differ, based on the size of the backup and the speed of the drive.

Restoring the Windows 7 Disk Image

Once complete, Windows will suggest you create a system restore disc. This is a good idea, so find a blank disc and follow the instructions. You can then use this to boot your PC and select the System Image Recovery option to restore the ISO Disk Image of your Windows installation following a disaster scenario.
Note that other system restore discs are available, although conversely these may not have the disk image restore functionality.

Natively Create ISO Disk Images in Windows 8.1 and Windows 10

The same tool for creating a disk image is available in later versions of Windows. You ideally need to have upgraded Windows 8 to Windows 8.1 before proceeding here.
To find the system image creation tool, press Start and type “file history“. The automatic search will display the File History entry first, so click this to open theFile History tool, then System Image Backup in the lower left corner.
muo-windows-makeISO-filehistory
You can then proceed as detailed above. With the ISO backup created, use the steps for Windows 8.1, below, to restore the image in Windows 10. In a disaster recovery scenario, you will need to boot into the Windows 10 equivalent of Safe Mode to restore the image.

Restoring Your Windows 8.1 Disk Image

If a Windows 10 upgrade doesn’t work out for you (perhaps you’ll experience a reboot loop), having an ISO image to fall back on is a massive advantage. You can restore the Windows 8.1 disk image in Window’s Advanced options screen, which you will find by pressing F8 repeatedly when your PC boots up (or holdingSHIFT as you click Restart).
In Advanced Startup Options, select Repair your Computer > System Image Recovery and follow the instructions, ensuring that Windows can find the ISO file.
Note that even if you have the Windows 8.1 installation media you can still restore the disk image. At the Install now screen, use the Repair your computer link and then Repair.
From here you’ll be redirected to the Advanced Startup menu, so selectTroubleshoot > Advanced options > System Image Recovery, following instructions to restore your Windows ISO system image.

ISO Like this Solution!

As you can see, creating an ISO image backup of your entire Windows system is perfect for backing up in advance of a major system upgrade. Additionally, the speed with which the ISO can be created and subsequently restored should make it a far more attractive option than just backing up your data and hoping for the best.
Have you used ISO system images to backup and restore Windows? Did it help you avert a Windows 10 upgrade disaster scenario? Tell us all about it in the comments.

Wednesday, 16 March 2016

How to Create Windows 10 Installation Media

Whether you arrived at Windows 10 through a dedicated upgrade or — in case you were not eligible for a free upgrade from Windows 7, 8, or 8.1  — purchased a shiny new Windows 10 license to upgrade to, eventually you will have to restore or reset Windows 10.
There are now a whole host of ways to install Windows 10, and we’ve covered a comprehensive selection of how you can create your own installation media.

1. Windows Media Creation Tool

The first and most obvious choice for creating Windows 10 installation media is the Windows Media Creation Tool. This application allows you to get the Home or Pro versions of Windows 10, and you can pick from the 32-bit or 64-bit version for both. Following your selections, you can choose to install directly to a USB drive, or download a single or dual use ISO to install to a disc at a later time.
Download the Windows Media Creation Tool. Once downloaded, run the application and select Create installation media for another PC. Windows 10 will download within the application, ready for you to choose your version, system architecture, and which versions you’d like to include in your Windows 10 installation media.
Windows 10 Media Creation Tool ISO
If you choose to install directly to a USB or disc, follow the onscreen instructions to complete your installation. If you’re installing further down the line, read the next section.
Windows 10 Media Creation Tool Architecture

Without the Help of Microsoft?

If you’d like to press on without the Windows Media Creation Tool, Microsoft has made provision. The Windows 10 Tech Bench Upgrade Program allows us to download both 32-bit and 64-bit ISOs of Windows 10 without using their download and creation tool. There is no indication that the versions downloaded here or using the Media Creation Tool are in any way different, so it really is down to personal preference.

2. Make Your Own Bootable Media

If you opted to download your ISO to install at a later date, this is the section for you. Let’s take a quick look at how to transfer that ISO to a USB or a disc.

USB Installation Media

Now you have your shiny new ISO, you need to create some bootable media. I’ll be using Rufus to create our bootable USB. It is a tiny, free application, and scores relatively well among similar applications with more extensive features. For the purpose of this installation, we only need to create a bootable disk, so go ahead and download Rufus.
Once downloaded, open the application. Select the Device you’d like to install to. Now, head to the button highlighted in the below image. This opens a File Explorer window for you to locate your Windows 10 ISO. Once you’ve found it, select Open. Rufus should now automatically update the information for you.
Rufus Windows 10 Installation Media
Double-check the Partition type is set to MBR partition scheme for BIOS or UEFI-CSMthe file system is NTFS, and your cluster size should be set to 4096 bytes. Also ensure the option to Create a bootable disk is actually checked. It should have automatically selected when you chose the Windows 10 ISO. Set an appropriate volume label, e.g. Windows 10 64-bit ISO, and then you can pressStart.
Rufus will take care of the rest. Go and make a cup of tea, and come back in about 15 minutes.

Disc Installation Media

You don’t have to use a USB to create your installation media. Many people prefer the traditional disc approach, and there are numerous free applications to help you get the job done. For this example, I’m going to use ImgBurn.
Once downloaded, install and open the application. Select Write image file to disc. Select the folder icon as highlighted in the image below.
ImgBurn Windows 10 Installation Media
This will open the File Explorer window, where you can select your Windows 10 ISO. ImgBurn should take care of the vitals, much the same as Rufus, but check theImp ID is for a Microsoft CDIMAGE UDF, and it clearly states Bootable next toFile Sys.
ImgBurn Windows 10 Installation Media Details
Make sure the disc you’re burning to has enough free space. Ideally, use a new disc. Finally, set your Write SpeedMAX sets the maximum speed available to your drive. If the write fails, you can always try setting a slower write speed. Now you’re ready to burn!

3. Unattended Windows 10 Installation

If you’re pressed for time, heading out for the evening, or simply have other tasks to get on with while installing Windows 10, you could try an unattended install. An unattended install is as it sounds: you have no input during the installation. All it takes is a little setting up beforehand.
I will be creating a bootable USB for this part of the article.
First off, we’ll need to generate an Autounattend.xml answer file. This answer file will be included in our bootable USB, and will “answer” the questions throughout the Windows 10 installation.
Head to the Windows Answer File Generator. Enter your product key, and choose which options you’d like to include, such as accepting the EULA, skipping automatic activation, skipping the license rearm, the setup language, entering your computer name, keyboard language and input, whether to use express privacy and sharing settings, and a handful of other options.
Windows Answer Generator General Settings
Next, we’ll deal with partition settings. We must be sure to select the right settings, or it could end rather badly.
To begin, decide if you are performing a clean install or upgrading your system. If you’re opting for a clean install, change the Wipe Disk option to Yes. Select the number of the disk to install to. If you’re unsure of the disk number, head toControl Panel > Administrative Tools > Computer Management > Disk Management. Note the disk number and the partition number. Use my image as a reference:
Windows Answer Generator General Settings Partition Settings
I will be installing to disk 0. Select Yes to Main Partition Active. Ensure yourMain Partition Format is NTFS. Set a name for your Main Partition Label. Make sure your Main Partition Letter matches the Partition Order, e.g. my C: partition is equivalent of partition order number two.
Windows Disk Management
Finally, enter your User Account information, including a User Name, whether you’d like UAC enabled, and whether you’d like your account to Auto-Logon. You’re all set!
Scroll down to the console box. Download your Autounattend.xml file using theDownload File located underneath the box.
Windows Answer Generator General Settings XML Download
To complete the creation of your unattended Windows 10 installation media, follow the Bootable USB section we covered earlier in the article. When the USB is finalized, copy the Autounattend.xml to the root of the USB, alongside the installation files. The next time you need to install Windows 10, the entire process will be automated, leaving you free to drink tea and eat scones.

You’re Ready to Install

Be it through the official Windows Media Creation Tool, bootable USB or disc, you should be ready for a clean installation of Windows 10. Before commencing with your clean install, please make sure to back up any important files to a safe location – not the same drive you’ll be installing to!
Collect from : MakeUseOf
Back to Top